
Module: Operating Systems and File Trees
Computer Fundamentals Chunk 2, Module 1
Operating systems are the glue that connects applications that do stuff we want and the hardware that allows us to do it (processors, hard drives, keyboards, etc.). This module contains a few exercises and links to explore how an operating system acts as this glue and the concept of a file which is at the heart of the operating system.
Jump to a section
check_boxLearning Objectives
extensionCore Concepts: What is an operating system?
motorcycleExercise 1: Monitoring your computer's Health and Functioning
motorcycleExercise 2: Everything is a File (almost)
motorcycleExercise 3: Creating your own tree-structured file system!
Module Hamburger Guide
Learning Objectives
| check_box | Navigate the essential elements of the windows operating system including task manager, file manager, and control panel. |
|---|---|
| check_box | Explore the file system through both the graphical user interface and the command prompt and explain the connection between the two interfaces |
| check_box | Analyze the contents of files and directories and to determine the basic properties of each |
extension
Module Core Concepts
The operating system (OS) is often called the "platform" of a computer because it provides the resources that all software applications require to do their particular jobs. For example, a media player like VLC Player requires an operating system to retrieve sound files from the hard drive, send sound signals to the speakers, and receive instructions from the user.
The following diagram shows the relationship between a computer's hardware components, its operating system, and the application packages that run "on top of" that operating system.

How are programs and operating systems connected?
Every operation we perform on a computer interacts with the computer's operating system because the programs we use rely on the OS to interface with the hardware components. This feature of computer architecture is critically important because it allows application programmers (folks who write software, such as an Internet browser) to "not worry" about how the computer carries out very basic tasks, like retrieving a file from the hard drive, and instead focus on making the program's core functions work correctly.
Why would I need to know about the operating system?
The operating system manages many computer resources and settings that matter to every computer user ranging from controlling who can access the computer's resources and files, starting and shutting down the system, configuring "look-and-feel" settings such as the desktop background, the color of the icons, and more.
The OS of a computer also manages which software is installed, where its files are located, and coordinates how the various programs which run on a computer can share resources such as the processor, the RAM, disk drives, and more.
motorcycle
Exercise 1: Monitoring your computer's Health and Functioning
Exercise type: Guided Exploration
Proceed through the following steps to explore the basic functions of your computer's operating system. Understanding how these tools work will allow you to customize your computer's settings, deal with malfunctioning programs, and use powerful software that requires system-level configurations.
These exercise steps are designed for students with computers running the Microsoft Corporation's proprietary Windows operating system. Similar features exist in Linux (a non-corporate, open source operating system) and OSX (the OS running on most Apple computers).
System resource monitoring and application coordination
This sequence will help you explore your operating system's monitoring and coordination tools often called the "system monitor" or "task manager." Because a computer can run many applications at the same time, the operating system is responsible for coordinating how those applications work together to use shared resources, such as the computer's processor, memory, and hard drive space.
- In Windows, search for and run a program called "task manager". You can also load this program by pressing Control + Shift + Escape all at the same time.
- In Windows 10, you'll see a little down arrow next to the prompt "More details". Go ahead and expand this to see a full list of all of the applications and system processes that are currently running on your machine. You'll also see a number of tabs appear at the top of the window including "processes", "performance", and "startup".
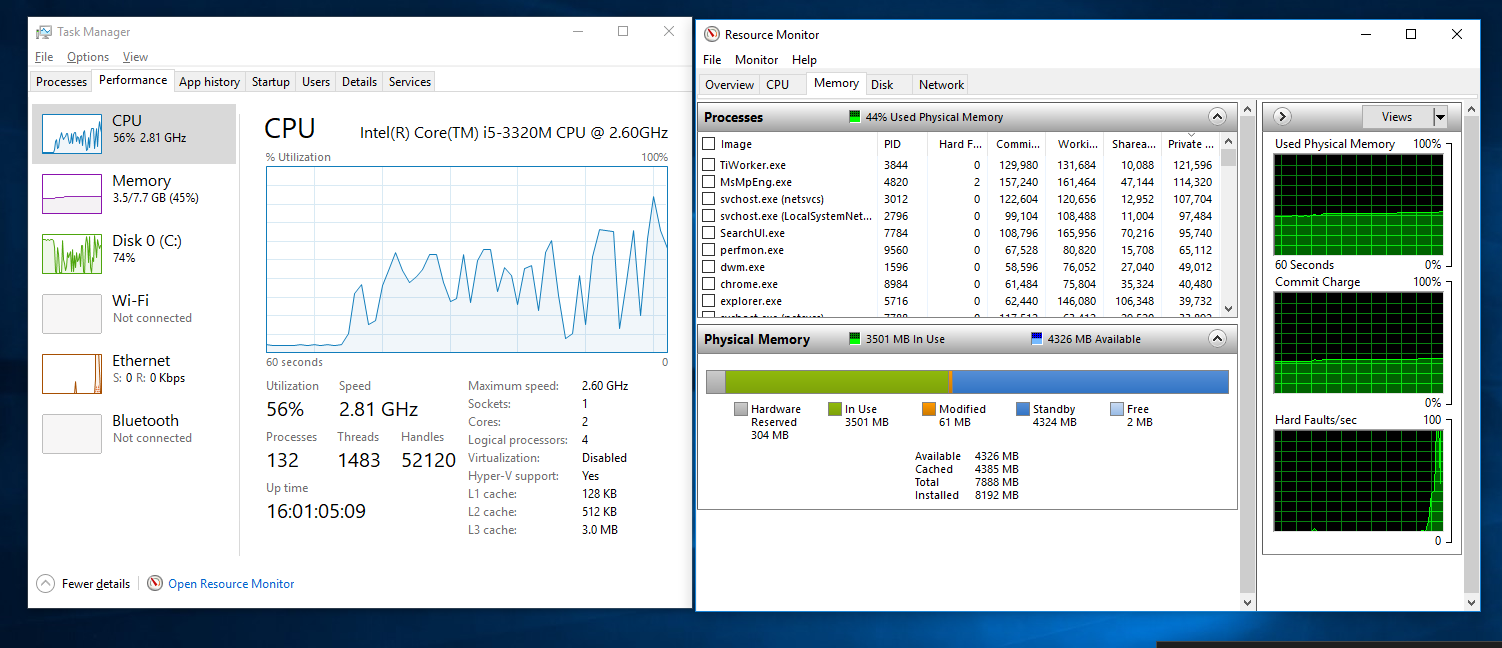
- You will also see a link at the bottom of the task manager called "Open Resource Monitor" which will launch a program that provides even more detailed information about the programs running and the system resources that each is using. (If you are using a computer managed by an organization, such as CCAC, you probably cannot access the more advanced resource monitor due to (unreasonably) strict access control restrictions placed on non-administrative users.) A screen shot of these programs running on Eric's Windows 10 box is below:
- Devote a few minutes to poking around each of these tabs. Look for connections between what you know about the various hardware components in a computer and the displays in these programs. You'll notice that this application shows how much of your computer's RAM is used at any given moment, and the current activities of the CPU.
- Watch how your computer's resources are used by various programs by keeping the task manager and resource monitor open and then opening a few other programs of various sizes. If you open, say, a web browser and navigate to a graphics intensive site, such as YouTube and play a video, you'll be able to see the processor work harder and your free memory available decrease. Try closing those programs and watch those system resources become free again for other programs to use.
If you are the curious type, you can read all about the Task Manager in this wiki page  on Microsoft's support network site.
Document your learning
If you are following this tutorial as part of an online course, you should have been directed to create a word processing document to record your learning. Please create a heading for "Exercise 1" and record the following information based on your explorations:
- How much total available memory (RAM) does your system contain?
- What is your processor's "clock speed"? It is listed as some number of "GHz" for gigahertz.
- Scan the list in the "Processes" tab and record how many "Apps" are currently running, how many "Background Processes" and how many "Windows Processes" are running. REFLECT: What can we learn about an operating system by noting the number of processes that are running that aren't programs you are currently using?
- Choose a program that you think is "resource intensive" such as a web browser, a game, or a media player. With that program closed, record the "resting" memory use and processor use. Now, start that program and watch the system resources change. Record in your document the change in total memory used by that program. What was the peak processor use during the load of the program? You can also see a listing next to each program in the Processes tab the total memory used by each individual program.
- Try using the Process tab to force that program to close by finding that program in the list, right clicking it, and selecting "End Task." You should find that the program "disappears". This is very handy when a program "crashes" and cannot be closed by the normal means of using its file menu command or clicking the "X" in the upper right. What program did you close? Have you ever had a program get stuck and had to force it to close? Why do you think it happened?
- Repeat this process for a few programs and make a note of which programs are resource intensive (i.e. "heavy") and which are less intensive (i.e. "light").
motorcycle
Exercise 2: Everything is a File (almost)
Exercise type: Guided Exploration
A file is a named chunk of information in a computer that is created, stored, retrieved, and updated as a bundle. The operating system is responsible for tracking where each and every file in the system is located, coordinating access to those files, and allowing the user and programs to manipulate those files. This sequence will guide you though exploring various file types in your system and how to access and edit them.
Watch the companion video to this exercise
The video: Week 2, Segment 3 posted on YouTube will guide you though an exploration of the file tools available in operating systems. When done, then work through the following documentation steps.
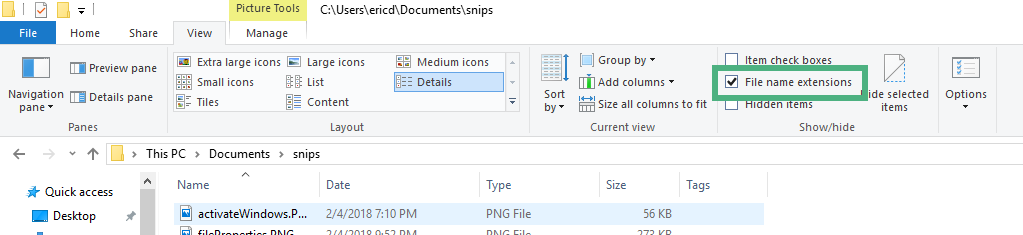
Note that the video will ask you to open your file explorer and enable viewing of the file extensions, which is a check box located in the "View" ribbon inside your file explorer, as pictured below:
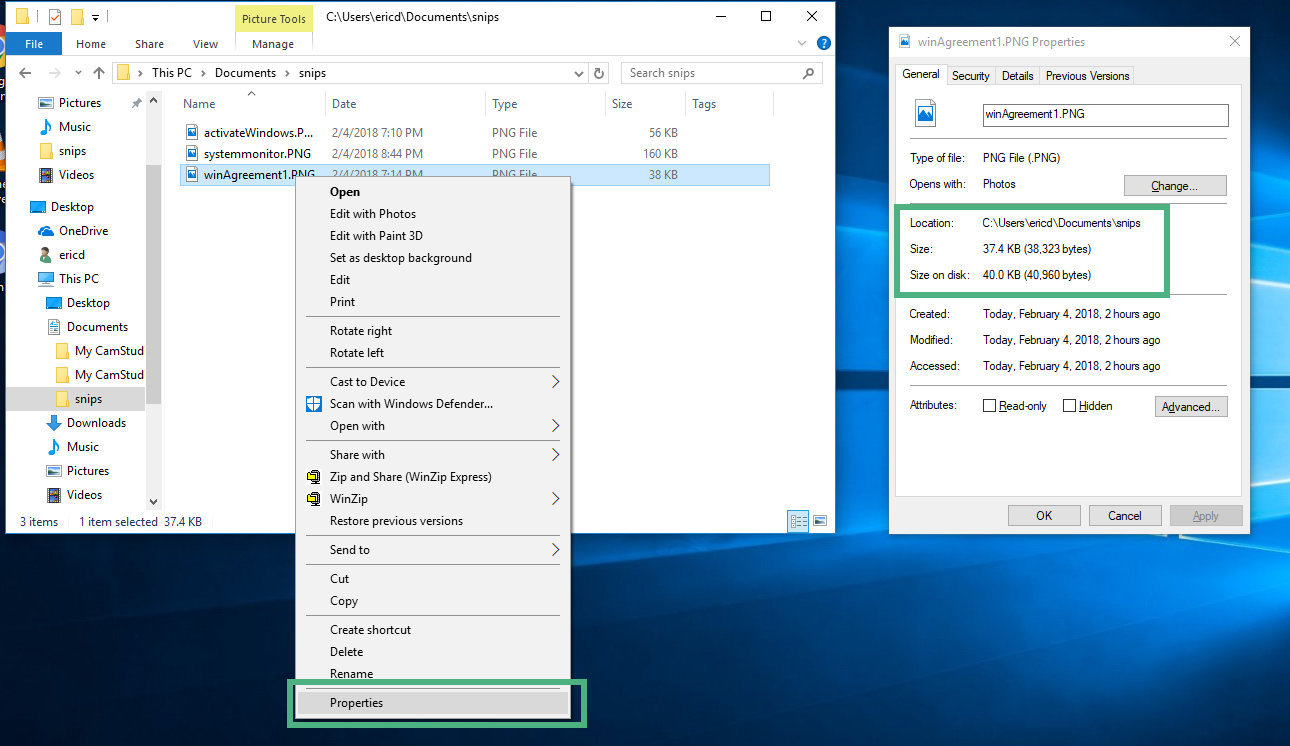
You'll be guided through locating the file properties dialog box and exploring the various features of the operating system's file management tool set. This screen shot is of the properties dialog box for an image generated by the Windows screen Snipping application:
Document Your Learning for exercise 2:
- Locate an image file on your computer, probably somewhere in your Documents directory. View the properties for this file and record in your word processing document this information about the file:
- The file's location as a complete path from C:\
- The type of file, as indicated by the extension
- The file's size in KB and in Bits (number of 1s and 0s) using this conversion tool.
- The dimensions of the image in Pixels (as found in the "Details" tab of the properties dialog box for that particular file.
- The date this file was created and last modified
- Navigate to one of the many operating system file directories, such as C:\Windows\System32\ containing files that you have probably never heard of or used before. Record the same information as you did for the image file for two other files in this system directory. (They aren't images so they won't have a pixel size). Try choosing a file with a .dll extension and one with the .exe extension (an executable file--i.e. an application).
- Ponder for a moment and then generate an answer to the following question: Why does exploring the properties of a single file help us understand how an operating system works? (Doesn't need to be long, just thoughtful).
motorcycle
Exercise 3: Creating your own tree-structured file system!
Exercise type: Creative Project
Files in your system are stored in tree structures. This activity will ask you to generate a mini file system and store some interesting file-based content as "leaves" in that tree.
View the guide video embedded below: Week 2, Segment 4 for a walk through of this activity. The following steps will be also note how to document your tree-creation process.
- Choose a topic of interest to you: one that can be divided into categories and subcategories and that you can find related media on the Web to pull and sort into your tree. A good place to start is to download one of the existing trees created by students attending in-person sections.
- Once you download the file from the shared folder, right click that directory which is zipped/compressed and right click: select "extract all" and then follow the prompts to unzip the files. Now you can navigate those files normally. You can view the step-by-step from Microsoft support here.
- On a regular old sheet of paper, create your directory structure of your tree that shows the nested folders. The root of your tree should be the general category of your interest: such as "cars" or "desserts" or "video games." Here is a sample hand-written tree plan:
- With your plan in front of you, navigate to your Documents directory in Windows Explorer. Start building your tree in the computer by creating your root directory (i.e. "folder"). For the example tree above, the root directory would be called "Movies." You can create a new folder by 1) Holding down control + shift and tapping the "n" key or 2) Right-clicking your mouse in the open white space underneath any files inside a directory >> New >> Folder.
- Then navigate into that root folder and create the subdirectories inside that one, so in this example, the student's subdirectories would include "Action", "Adventure", "Comedy" and so forth.
- Once you have all of your directories created, you can start filling those directories with the "leaves" or the actual files that show examples of the content you're interested in. You can find this content via an image search on the internet. When you have found an image or movie of interest, right click that image >> save image as >> then navigate your file tree and find the appropriate directory and save the image there.
- You can create links to Internet content by navigating to a directory in your tree, right clicking in the open white space >> New >> Shortcut and follow the prompts to paste in the URL/link and choosing a name for the file.
- In your documentation for this week, paste in an image of your hand-written file tree. You can take this with a camera or use a scanner. Or, you can create your file tree in a program on the computer and export that image. Draw.io is a free google-docs based program that is great for making diagrams (the operating system diagram above was created in Draw.io).
- Also, choose a leaf (i.e. a file) you find most interesting, and write the path to that file, which is a listing of all the directories from the root to that leaf's directory and the actual file name and extension itself. In the example above, the student is most interested in the files in the Grown-Ups directory so the path to the file photo1.jpeg would be: "Movies\comedy\grownUps\photo1.jpeg"
- In a sentence or two, summarize why file trees are a clever way to organize information in a computer. The guide video is an excellent resource for learning about the advantages of a file tree as opposed to a simple list of files.

Page created on 7 Feb 2018 and last updated on 7 Feb 2018 and can be freely reproduced according to the site's content use agreement.