Module: Spreadsheetify Your Life
Digitize some part of your life you currently manage on paper (i.e. analog) by creating a much schnazzier spreadsheet-based replacement.
preparation |
Complete the module: Spreadsheet Fundamentals which builds your working knowledge of basic spreadsheet navigation, formula creation, and formatting. This is an excellent choice for a second spreadsheet module with potential to morph into a final project! |
objectives |
check_boxDesign a data organization system (i.e. a schema) to meet the needs of a user--you! check_boxConfidently navigate the core functions of a spreadsheet: formulas, sorting, filtering, and visualization |
time considerations |
Set aside a week: Start by devoting a few hours to designing your tool. Over the course of the week, use and test your tool. Finally, plan a few hours to document and share your work. |
resources |
The University of Pittsburgh's Microsoft Excel Fundamentals guide is GOLD Kevin O'Brien's Libre Office suite tutorials on his professional page: ahuka.com. |
steps in brief |
Step 1: Explore samples & pick a topic of your own |
"submitting" |
|
Step 1: Explore samples & pick a topic of your own
Make an time log spreadsheet with CCAC student Luke Ross
The following screen cast was created by technology rediscovery student Luke Ross and demonstrates him converting an hour log he previously kept on paper into a spreadsheet for submission to his client.
Explore some nifty spreadsheetification project examples
Click each screen snipping below to view the sample spreadsheet in OneDrive Excel online. If you have a CCAC account, you can even copy and tinker with any file linked here. Remember: Use these for inspiration purposes. You should start your own from scratch.
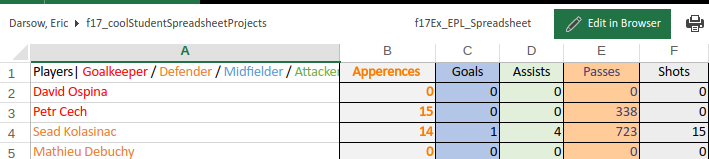
Crunch fantasy sports statistics in a spreadsheet:
The most extensive and impressive game strategy spreadsheet on earth:

Tracking the stages of human pregnancy:

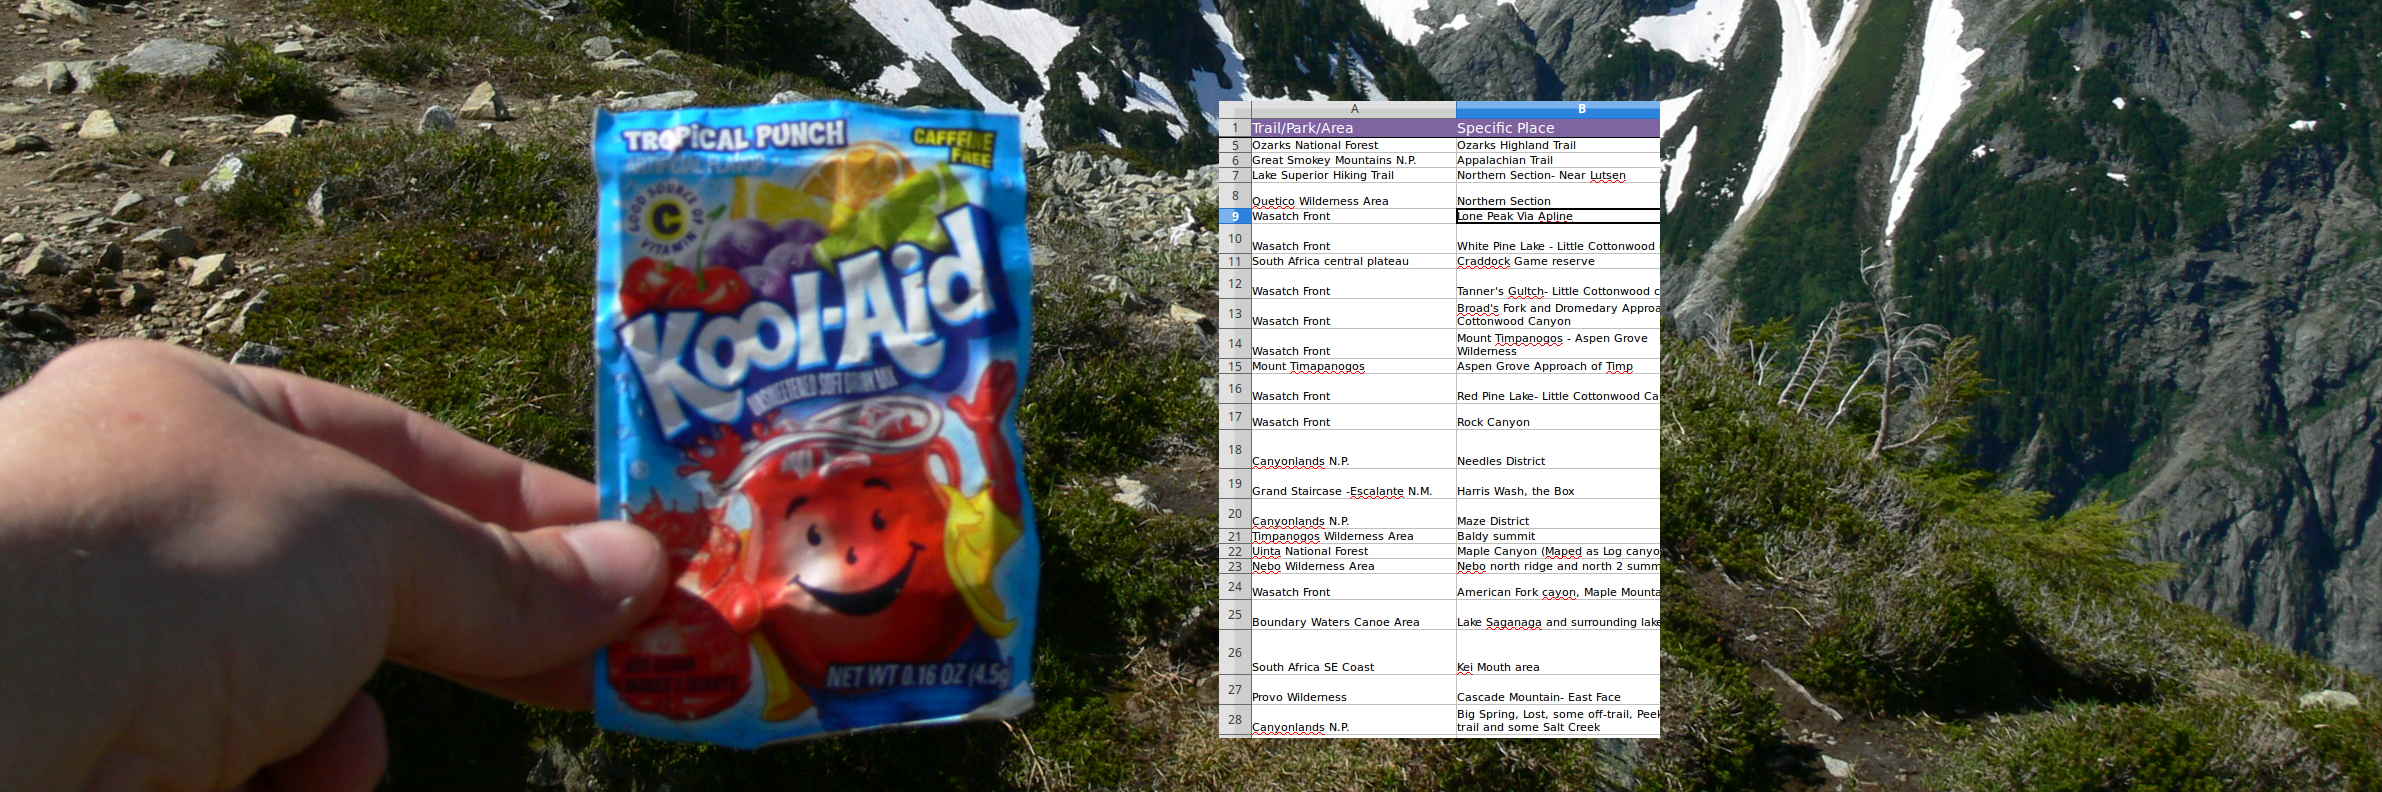
Your instructor's hiking trips during college years:

Check out the rest of the samples:
cloud_circleOneDrive shared directory of spreadsheet projects
Grab some coffee and design your own project
Luke likes to do computer stuff, so his hour log is interesting to him. Your instructor likes to hike, so a hiking log was a compelling project. Reflect on your own and find an area of interest that involves you collecting or organizing data. You may also have an interest that you could spice up by assembling information about it using a spreadsheet.
Some brainstormed possibilities:
- Game scores related to any kind of competition you enjoy
- Logging or organizing information related to something you collect (you may have started this before in our previous module
- Driving distances or patterns: times required for various routes to work, etc.
- Resource use of some kind: gasoline efficiency, water meter measuring, hours of lights on, temperature of house and bill amount, etc.
Step 2: Develop a spreadsheet "skeleton"
Make a "draft" set of columns headers
Create a new spreadsheet in your favorite spreadsheet program and start labeling the columns in row 1 with whatever information your currently have on paper or can think of that you'd like to track.
The name of the game here is: add whatever category of data you can think of to start. Then, take away what's not necessary later. So, for the hike tracker, the creator of the spreadsheet might have started making columns like: date, distance traveled, state, forest name, companions, season, etc.
Review your list and tidy things up
Take a look at your possible columns. Delete the ones you don't want or were overlapping with other categories. Perhaps split a column into two: I might have started tracking trip date with only one column, but I might later decide to have a separate column for start date and end date.
When your columns are pretty much set, follow these steps:
- Adjust column width to be appropriate for your intended data.
- Right click each column header and format the data in that column appropriately: dollar values should be formatted as currency, etc.
- In a separate tab, create a key for values in columns whose data might not be obvious. For example, maybe you use the word "d" in a column for "match outcome" and this means "draw." Note this in the second tab.
Step 3: Step 3: Beta-test your tool
key concept: |
The polished, correctly-working computerized tools we all know and love all began their lives as partially-baked beta designs. This prototype tool is then tested by using it in its intended end-user environment to discovery areas the system can be improved or strengthened. 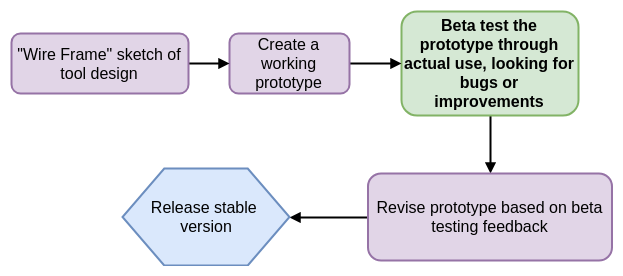
The closer the beta testing situation is to the actual end user environment, the more precisely bugs can be found. Some software companies have a much stronger track record of rigorous beta testing than others. Ask a vendor about their testing process before buying a product or signing a service contract. |
Beta test your spreadsheet
This process will take shape based on the data you're managing in the spreadsheet.
If you are creating a catalog of some sort for items that already exist, then your beta testing is simply adding item information into the tool and making notes of information you want to add to your system.
If, however, you are making a lot of data that you generate in your life, such as the number of miles you drive and the number of gallons of gas you by, you'll need to set aside time to actually use the tool and try entering data. Try to find useful patterns in that data with formulas like sum() or average().
Step 4: Tweak the design based on data from your beta testing
Duplicate your beta version spreadsheet
Before making changes in your design, let's duplicate your original sheet to show others how tools develop:
- Right click your current sheet's tab at the bottom of your spreadsheet >> Rename. Create a meaningful name with "_beta" at the end.
- Right click the tab again and select an option like "duplicate" or "move or copy". Once you have a second copy, rename that tab with "_release" at the end. Tweak this second version based on your beta testing results.
Your tab setup should be something like this:

Tweak your _release version based on your beta results
Adjust your table structure and the columns you made based on what was useful as you were using your tool or entering data. Perhaps you want to add a column? Design some more summary cells? Change your coding scheme?
Step 5: Package for worldwide sharing
Follow these basic steps to get your spreadsheet ready for distribution:
- Format your column headers nicely. Make them bold or with inverted colors to draw out their contents.
- Make sure your tab names are sensible and not "sheet1" and "sheet2"
- Remove any personal data you don't want splattered on the WWW
- Make sure you have a tab called "dataKey" or something like that to provide users a key if you use any symbols in your data collection.
Submit and share when you're ready
Page created on 2018 and last updated on 2018 and can be freely reproduced according to the site's content use agreement.