Module: Java Language Essentials
Chunk 1: Language Core | Module 1: Essentials
This module guides you through the essential elements of the Java language which includes variable initialization, manipulation, and display. We'll also solidify our basic class and method structure. These will be building blocks for the rest of our course, so take your time and develop confidence with each concept.
Jump to a section
check_boxLearning Objectives
bookResources and reference documents
extensionCore Concepts
motorcycleExercise 1: Organizing code into projects, packages, and classes
motorcycleExercise 2: Commenting and refactoring code
motorcycleExercise 3: Indentation and spacing
motorcycleExercise 4: Code Restructuring Challenge
Learning Objectives
| check_box | Explain the Java program creation lifecyle including the editor, compiler, and Java Virtual Machine |
|---|---|
| check_box | Create projects, packages and class files in NetBeans that work together to structure an application |
| check_box | Comment code, properly indent code and internalize the use of blocks { } of code to show structure |
book
Essential Module Resources
Many modules will contain links to three different resources: your textbook: Java: A Beginner's Guide (6th ed), Oracle's Java tutorials, and the Java 8 Application Programming Interface
Java: A Beginner's Guide (6th ed): Chapter 1 and Chapter 2
Oracle's Java tutorials on variables and primitive data types (We'll cover these in depth next week--but reading them a few times is very valuable).
extension
Module Core Concepts
Module overview video
Page elements:
As you work through the Java modules, these colored blocks will help you along
highlightThis is a core idea and its explanation.
bookThis box references our textbook: Java: A Beginner's Guide (6th edition). This is a required text (and only costs $15!). Pausing to work the book where noted in these boxes is a mandatory activity in this class.
warningThis is a warning and its explanation.
computer code looks like this
And some lines are indented
A Java Program's Life Cycle
Programming languages form an ecosystem, and just like a natural system, each species has its own characteristics. Since computers only run binary (sequences of 1s and 0s), we need some sort of program to translate text we write on a keyboard into binary. Java is part of a family of languages that accomplish this task with a program called a compiler which knows how to read human-written code and generate computer-runnable code. The following diagram shows the steps in the process of creating and running Java code:

Structure of a compilable Java file
The Java compiler is our friend, and a friend that holds us to high standards. The compiler follows very rigid rules about what it will convert into bytecode. It will not compile code that does not follow each and every rule of the Java language. As we work through this course, we must learn to be fastidious (extremely attentive to detail) in the way we code such that every character we type conforms to the Java specification.
In order to run (meaning compile and execute) even the simplest of Java programs, all code must exist in a structure called a Class. For a class to do anything, that class must have a structure inside of it called a method (which is a named block of code that does something).
highlightAll Java code is housed in a Class, which has a name that starts with a capital letter and contains no spaces. Inside each class, we write code that carries out tasks in a chunk of code called a method.
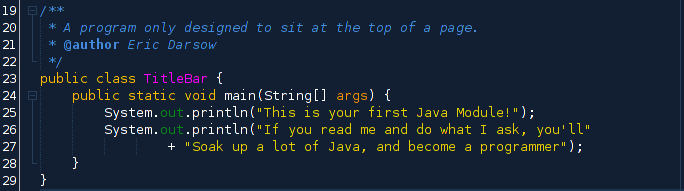
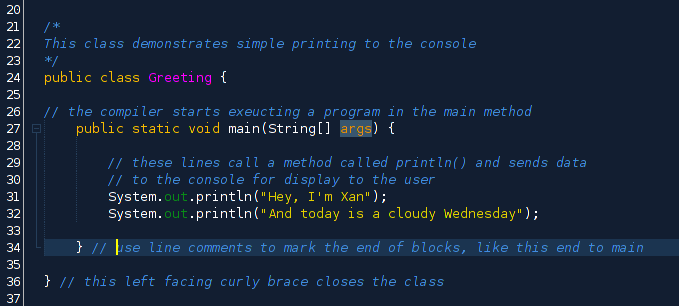
Let's write our first Java program that prints out the name of the programmer and today's date:
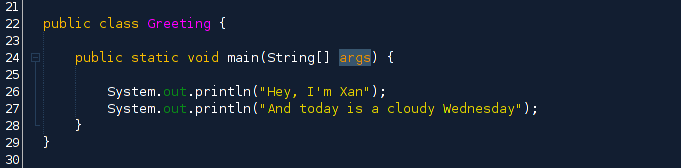
Code Example Explanation: The class is called Greeting and the method inside Greeting that contains code that does something is called main. The words public static void before the method's name (main) and the String[] args inside the () are keywords in Java that give the compiler instructions for how to execute the code we put inside the method.
This code was typed into Netbeans which has its own color scheme for highlighting various parts of the Java code I wrote. We can run this program by navigating on the menu bar to Run >> Run File or by pressing the Shift + F6 keys. When we do, we get this output:

Note that the only output we see from the computer is the text that is included in "" marks inside the (). The other Java code functions as instructions to make the printing to the console happen.
bookPAUSE & STUDY our textbook called Java: A Beginner's Guide 6th Edition (We'll call it JABG6) Pages 12-15 which explains a program that has exactly the same elements as this example but prints out slightly different text. PLEASE for your brain's sake don't skip over these teal boxes with book activities!
motorcycle
Exercise 1: Organizing code into projects, packages, and classes
Exercise type: Tool Skills
NetBeans is a software tool designed to help coders work efficiently and keep their digital lives organized. This exercise will walk you through where to place the code you write so you don't go crazy after a while with Classes and files lying about all over the place.
Follow these exercise steps carefully, and don't be afraid to slow down and tinker and experiment. Remember: You can't really break anything in NetBeans that you can't fix, and making mistakes is an important way to learn--even if those mistakes are "intentional" ones.
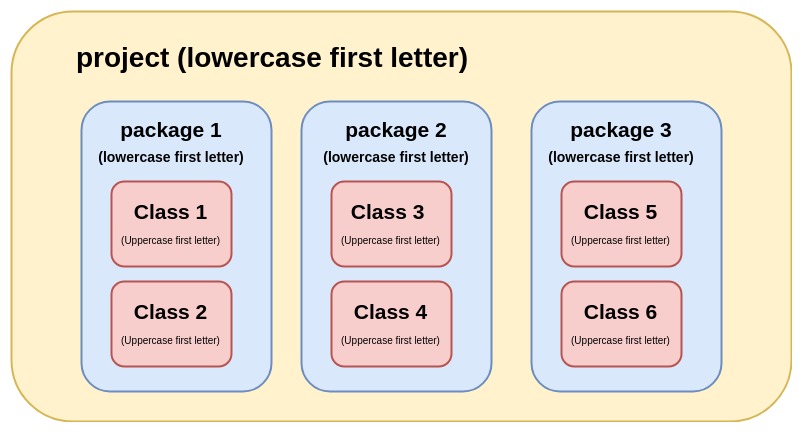
- In Week 1, you typed in code and ran that code in NetBeans. As you learn to code, you'll write dozens of different classes, and those need to be kept organized or you'll quickly get overwhelmed. Study the following diagram that shows how NetBeans projects, packages, and classes are related to one another:
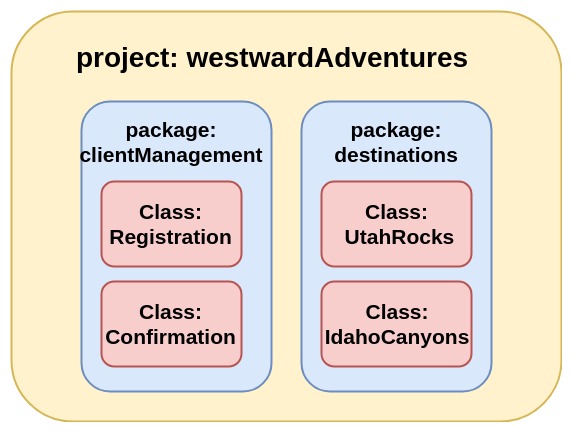
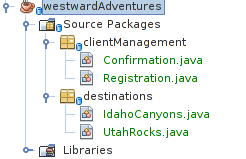
- We are going to practice creating a project structure that includes several packages and several Java classes in each one. Imagine we work for a company that coordinates outdoor adventures and uses Java to track clients and destinations in our database. Let's customize the above diagram to include the actual names of the project, package, and Classes we'll be creating in this exercise:
- Using our skills from week 1, create a new project called "westwardAdventures". NOTE that you want to UNCHECK the "create main class" check box in the create project dialog box since we want to create our own classes, not a default one. In that project, create a package called "clientManagement" and so forth. When you create the classes inside each package, be sure to use Capital letters to start the class. ()
- Remember, if you want to create a new package inside a project, right click the name of the project and select New >> Java Package. Similarly, if you want to create a class inside a package, right click the package name and select New >> Java Class.
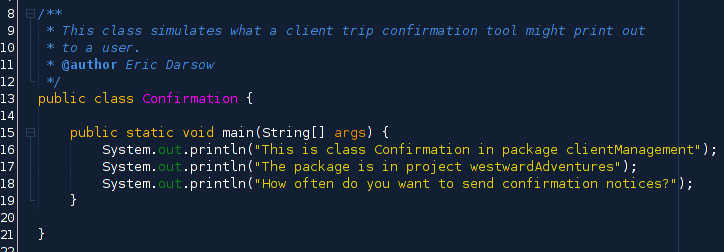
- You should have one project, two packages, and two classes in each package. Using our Greeting class as a model, write four simple programs--one in each class--that print data to the console. Have each class print the name of its package and project. You can also be creative and imitate what a class with its name might actually ask the user. The Registration class might prompt the user "Enter the registration number of the client you wish to look up."
- Typing out four short programs that only print stuff may seem repetitive (repetition builds confidence). Try to see if you can completely code one of the four classes without looking at a reference--which means remembering how to name the main method, print to the console etc. The more you can remember by heart the faster you can code easy stuff and focus on trickier tasks.
- When you are satisfied, run each of your classes. You can compare your project structure with the instructor's by clicking the buttons below. (Note that in the key, the Classes are in green text because your instructor uses the Git code management tool and the green means those classes are new.)
- As we continue our explorations of Java, you could come back to these classes and add features as you learn them!
warningNetbeans will even remind you that the convention is to use a capitalized first letter for class names: if you try to create a class with a lowercase starting letter a warning will appear at the bottom of the create class dialog box.
motorcycle
Exercise 2: Commenting and refactoring code
Exercise type: Code skills practice
This exercise builds your skills of commenting and arranging code so it's readable by you and others. Remember: Not only computers read code--humans do too! The more we can create easily accessible code, the less likely we'll make mistakes.
- Open back up our Greeting class which printed out two simple lines of code. In Java, most of the code we write is for the compiler, but we also can include code for only humans to read that explains what a class, method, or line of code does. Comments come in two forms: Line-by-line comments and block comments.
- Use the following code example to add these comments to your greeting class. Run the program (Shift + F6) and verify that the comments are completely ignored by the compiler.
- Navigate back to our westwardAdventures project and add some basic comments to each of the classes you wrote. Note that you don't need to "over-comment" like I did with the above example. A comment above the class is the most important to explain why this class even exists.
highlightHow to comment: a // will signal to the compiler to ignore everything on the line which follows the //
A block comment starts with /* and ends with */ and can span several lines.
highlightBest commenting practice: Beginning coders often under comment because they haven't had the experience of returning to code even they wrote themselves and being disoriented. We write code for others to comprehend our code and to remind ourselves of what we were thinking when we wrote the code--perhaps months or years in the past.
motorcycle
Exercise 3: Indentation and spacing
Exercise type: Refactoring code
Unlike some languages, like Python, where indentation is required by the compiler/interpreter, the Java compiler doesn't require that the lines have spaces in between them or that lines inside { } are indented. These steps will walk you through experimenting with indenting and line spacing.
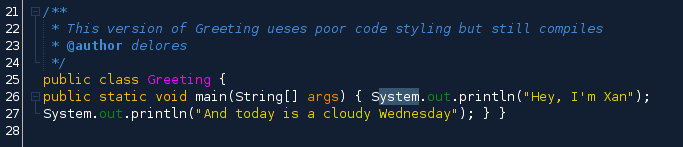
- Sticking with our Greeting class, adjust your code to look like the following code sample. It looks strange and is hard to read, but remember, the compiler just reads the character one after another and ignores spacing and indenting. You can indent with the Tab key and de-indent by holding down the shift key and tapping Tab.
- Run this class again and prove to yourself that it still compiles and the output is exactly as it was before.
- Practice formatting the code nicely by brining the indents and spacing back to the convention. Note how the { } include other code, and any code inside a set of { } is indented one tab. Similarly, because the main() method is inside the class Greeting's { and }, the entire method is indented. The println() statements are inside main() and those, too, are indented.
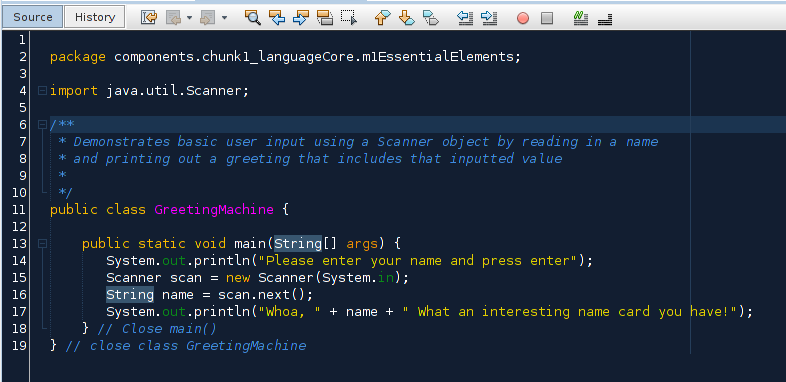
- With this in mind, try this activity: Create a new class called GreetingMachine inside a package called practice (or any other package is fine).
- Now delete everything except the first line that starts with package. Add the following line of code after package so your file looks like this:
- Your challenge is this: Copy and paste all the text in this code box into the file GreetingMachine that you just created. (It's a jumbled mess.) Add spacing and line breaks and indents so the code flows like it should. Blocks should open with a { and end with a } on its own line. Any code inside a block should be indented. This process is called refactoring.
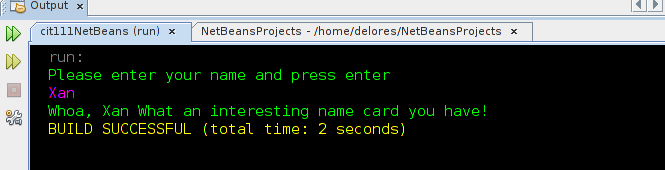
- When you have the code properly formatted, the output should be as follows when you run the code (note that this program takes in typing input from the keyboard, so once you run the program, enter text and press enter to see the generated third line of the output:
- If you get stumped or finished, check your work against this key by clicking the button below:
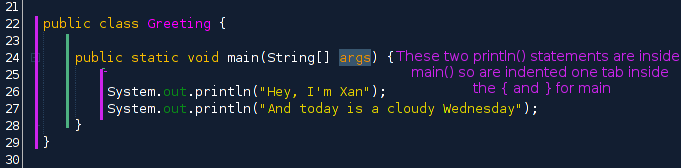
highlightDefining Blocks of Code: The opening { and closing } define a block of text. Any code inside a block is indented one tab inwards. This helps the reader of the code sense the structure of the program.
We can visualize the nesting structure of the code with this diagram of our Greeting class. The class forms a block (red rectangle) and the main method forms a block that is inside the class. Hence, the main is indented inside Greeting.

bookPAUSE & STUDY our textbook called Java: A Beginner's Guide 6th Edition (We'll call it JABG6) Sections called "Create Blocks of Code" on pages 24-26 and "Indentation practices" on page 26. You may also try entering and running the sample program on page 27-28 to get some exposure to the code we'll work with next week. PLEASE for your brain's sake don't skip over these teal boxes with book activities!
motorcycle
Exercise 4: Code Restructuring Challenge
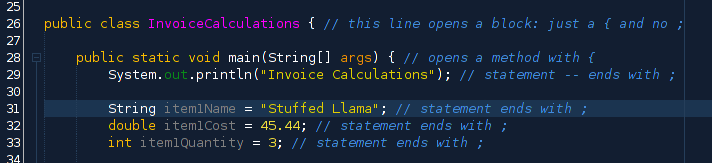
All code in Java is either defining a block (like Classes and methods) or issuing a statement which tells the compiler to do something, in which case it must end in a semi-colon ; The following comments in a sample program we'll use in the next module shows this:
warningMake sure that the first line of the file that starts with the word package lists the package name exactly as the package is listed in the left hand side bar of NetBeans.

import java.util.Scanner;
public class GreetingMachine { public static
void main(String[] args) {
System.out.println("Please enter your name and press enter"); Scanner scan
= new Scanner(System.in); String name
= scan.next();
System.out
.println("Whoa, " + name + " What an interesting name card you have!"); } }
// close class GreetingMachine
Page created on 7 Feb 2018 and last updated on 7 Feb 2018 and can be freely reproduced according to the site's content use agreement.