
Module 4: User Input and if()-cotnrolled blocks
Gathering data from the user and implementing execution logic
Programming might be crudely summarized as the act of organizing data and acting upon that data using logic. This module will explore methods for gathering input data from the user and implementing logic blocks that determine how the program acts on that data using if(){...] and while(){...} controlled blocks.
Jump to a section
check_boxLearning Objectives
extensionCore Concepts
motorcycleExercise 1: Amusement park rider height
motorcycleExercise 2: Speeding on the highway again?
motorcycleExercise 3: User authentication
buildMini Project: Will my car make it to the next station?
flight_takeoffExtension Exercises
Learning Objectives
| check_box | Use a Scanner object to gather int, String, and double type values from the user's console and process that data using logic blocks |
|---|---|
| check_box | Implement basic logic using an if(){...} controlled block and test that logic for correctness |
Setup your workspace
Let's keep our code organized by creating new Java package called week4 and create a few classes inside this package that we'll use throughout this module. To do this, make sure you have a NetBeans project open--you are encouraged to use the same project as you used in the previous modules. This is, however, not at all necessary.
Create the following Java class files inside your week4 package:
- UserInput
- IfControl
- RideHeight
- SpeedEnforcement
- UsernameAndPasssword
When you've created these class files inside week4, your NetBeans project view should look like this (except your class files will be in black text, not green like mine):
Note that the icon next to my class UserInput has a green triangle inside of it: this means that I have created a main method inside this class which the compiler uses as the entry door into the program. The other two classes are just shells, without any code inside the { and } of the class. Once you create a main method in these classes as you work through the core concepts section, the green triangle will appear in the icon.
highlightThis is a core idea and its explanation.
bookThis box references our textbook: Java: A Beginner's Guide (6th edition). This is a required text (and only costs $15!). Pausing to work the book where noted in these boxes is a mandatory activity in this class.
warningThis is a warning and its explanation.
Module Core Concepts
Module core concepts overview video:
This clip walks through the fundamentals of the Scanner object and how it allows us to gather user input. The code used is the first program in this core concepts section which calculates the tax on any given sale amount.
Using a Scanner Object to gather user input
In the last few modules, we've entered values for variables directly into the Java code itself, which is a lot less useful than writing code that can process data that comes from an outside source, like the user whose at the keyboard.
In order to collect this data, the following program uses a Java Object (we'll learn about objects as we go, and dig into them in the third chunk of the course) called a Scanner to read keys the user types into the keyboard into the program and store its value in a variable we create.
Transfer this code--including its comments--into your UserInput class and execute it to see how it works.
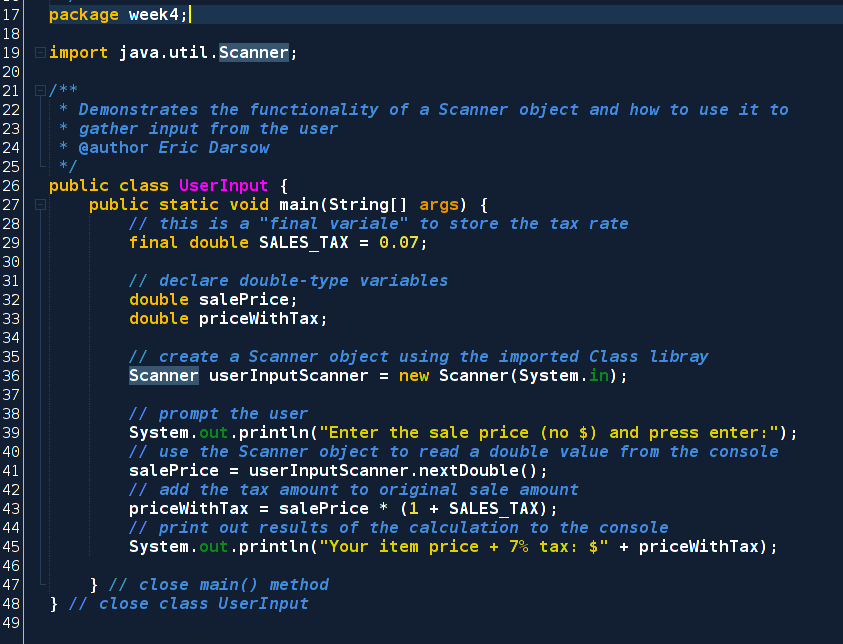
When you run this program, you'll be able to enter values into the output window. Note that you'll have to click the mouse inside the output window in order to bring focus to it and direct keyboard input to the program.
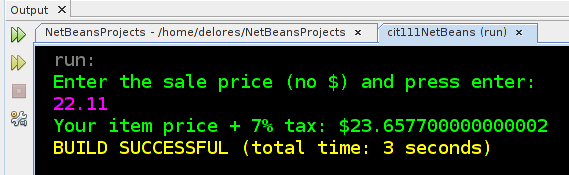
This code, while short, involves using a Scanner object to carry out sevearl important steps that occur behind the scenes to get whatever the user types into the keyboard into our variable called salePrice. Study this diagram closely, pausing to determine what you can understand now, and what you will need to learn more about as the course continues:
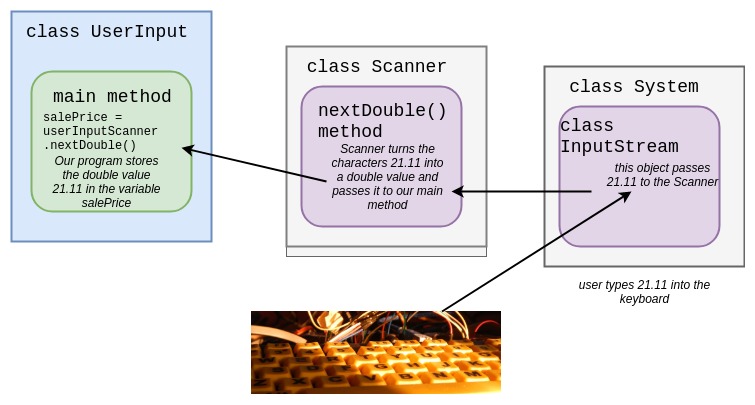
Note that the only class we're writing is called UserInput but our code is actually running code that is part of the Java library of classes that help programmers do handy stuff with very little effort--such as grabbing input from the keyboard and converting it into data that we can manipulate.
Line 19 in the code sample above reads import java.util.Scanner; and this is the line that is like going to the Java library, checking out the book called Scanner located in the section java and the subsection util and setting it on our desk. This link will open up documentation for the Java standard library, which we'll explore a lot in the second half of the course.
highlightWe can grab source code to use in our own programs by using import statements that tell the compiler where to find the library Class we want to work with. In this example, we used the Scanner object to get input from the keyboard into our program.
Our UserInput class is using a Scanner object which was written by a coder whom you've never met and shared in a public and free library of Java code. This Scanner object knows how to interact with a System object that has an object inside of it called an InputStream that actually does the work of finding out how your computer's keyboard is connected to the system and interpreting what the codes mean when a given key is pressed (like the number keys, the . key, and the Enter key).
You're not expected to be able to digest all of this information yet! The important part to grasp at this stage is that when we're writing new Scanner(System.in) we are invoking code that we didn't write to do tasks that we don't know how to do and that are rather complicated. Much of what we do as programmers in any language is to hook together code that others have written and shared to do tasks that we want done, such as to calculate a final sale price given a pre-tax amount.
Java is a "strongly-typed" language: Revising variable types
Java is known as a "strongly-typed" language because each variable must be declared to hold only one kind of data of a certain format, such as an integer value or, in our case, a double value--which is a number with a decimal point. If we try to store data of an incorrect type in any variable, the compiler will "throw" an error and, in most cases, our program will stop running immediately.
Let's explore this concept a little by typing a value into our tax amount calculator that is not a double value: such as text characters:
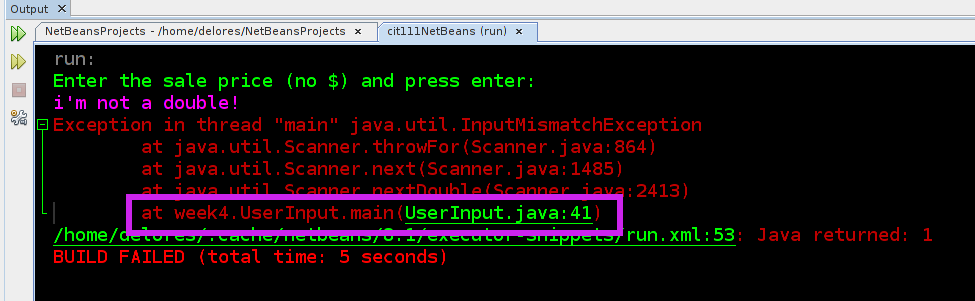
The text "i'm not a double!" cannot be converted into a number with a decimal point. This error occurs when the scanner tried to create a double value out of what we typed. The ugly looking error message is actually our friend: read them ALL carefully.
It says there is an Exception in thread "main" and that error is of the type InputMismatchException. A mismatch is a concept that we understand from outside coding: if we try to put a shoe made for left feet on our right foot, we have a mismatch: the foot and the shoe don't fit. Similarly in Java, we get an InputMismatchException when we try to store a text value--called a String in java--in a variable that can only hold double values(those with decimal places).
warningRead error messages carefully! Woe be under the coder who doesn't take time to understand compiler and NetBeans errors because once code becomes even a tad bit complicated, we'll need to know how to get information from error messages to help with debugging. Even if you can't comprehend each word in a message, don't be discouraged. The only way to learn stuff you don't understand is to dissect it carefully and look up terms you don't know.
Finally, note that a purple box was drawn around the line at week4.UserInput.main(UserInput.java:41 tells us exactly where the error occurred in our code. We can click the link in that output box and NetBeans will take is right to line 41 which was where we called the nextDouble() which tried to turn the text (String) value into a number with a decimal point. How handy! If we didn't expect this to happen, we can use compiler errors to debug our code, even down to the very line that caused the issue.
The compiler's ability to tell the programmer where errors occurred is a majorly great thing in modern coding software. In days gone by, coders didn't get this level of feedback from the compiler and had to devote much more time to debugging as a result.
Implementing logic with if(){...} blocks
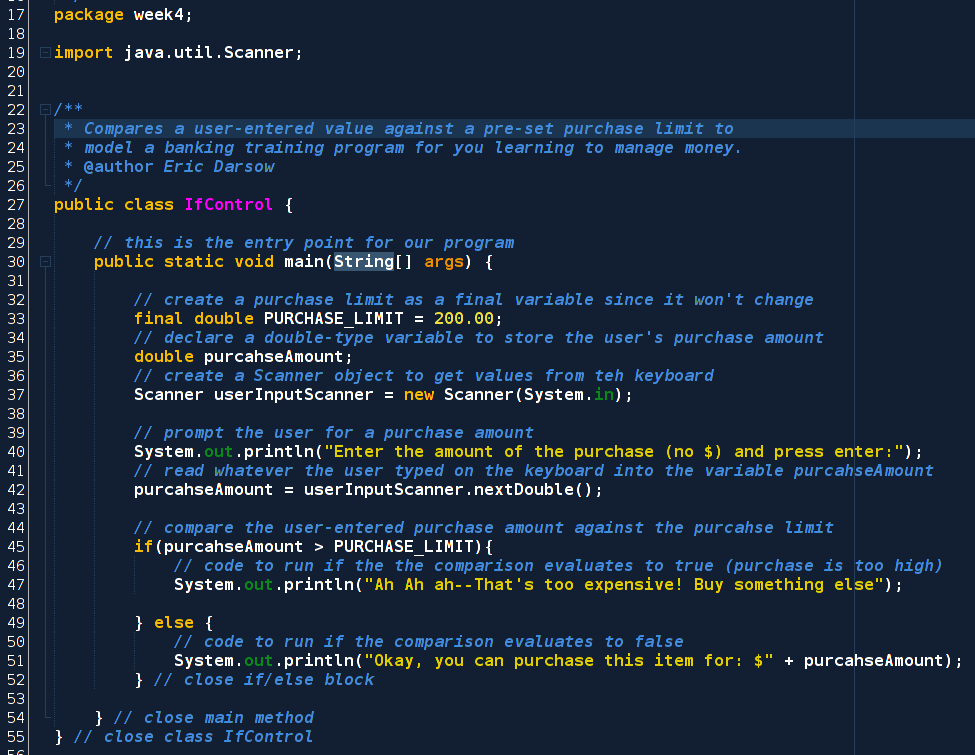
The previous section exposed us to getting input from the user. The power of programming comes from writing logic into our code that can test input values for various characteristics (Is the input higher than number x? Is it equal to a stored password?). Let's write some new code that builds on the idea of our tax calculator to implement some basic logic that warns the user of any final sale amount that is over a certain amount, such as purchase limit on a credit card designed for youth learning to manage their money.
highlightProgram specification: Create a program that stores an internal purchase limit set by the programmer. The user is then asked for a purchase amount. Finally, the program outputs a prompt to buy something else if the purchase amount is above the limit. If the user's purchase amount is below the limit, display a confirmation that the purchase is allowed. and its explanation.
To achieve this specification, we need to think carefully about what each part of code must do. Here's a sample flow chart of how the above specification might be planned out. Please grab a sheet of paper and as you study this diagram, create it for yourself on real paper:
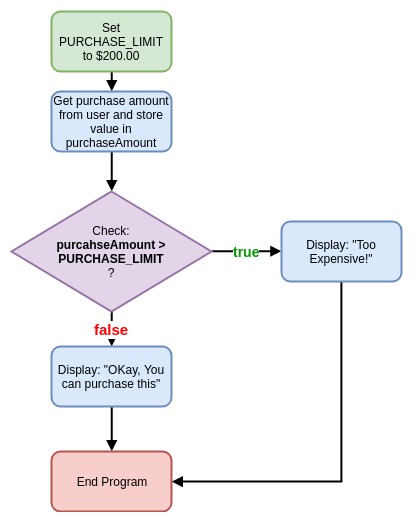
Notice that each task in our program is summarized in a rounded rectangle. Any decisions that our program must make are declared in a diamond. The flow coming from this diamond corresponds to each of the possible outcomes of the test. In our case, the if statement can work with outcomes of true and false.
Navigate to the class you created at the start of this module called IfControl and transfer this code into the class exactly as it is printed (including comments!):
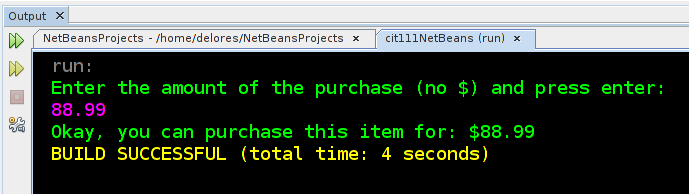
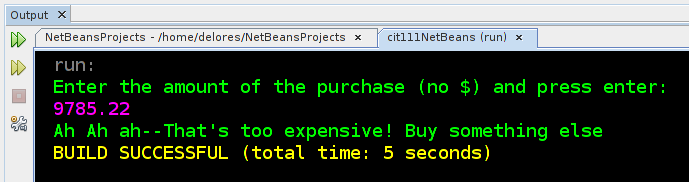
Run this program a few times with various input values both above and below the purchase limit to make sure our logic is implemented correctly:
Test of a purchase amount BELOW the limit
Test of a purchase amount ABOVE the limit
bookStudy if() statements Java: A Beginner's Guide: The if() statement is discussed at the beginning of chapter 3 (6th ed pages 63-68). Type in and run the three examples sets, including "Nested Ifs", which we'll use in the exercises below. If you have other editions, check the table of contents and please make a note in our edition synchronization google doc. NOTE: The chapter introduces for() and while() loops, which we'll certainly explore, but not yet. Read as you'd like.
Now that you have some practice with this module's core concepts, work each of the following exercises to practice and expand your skills.
motorcycle
Exercise 1: Simple If() Practice
Exercise type: Amusement Park Ride Height
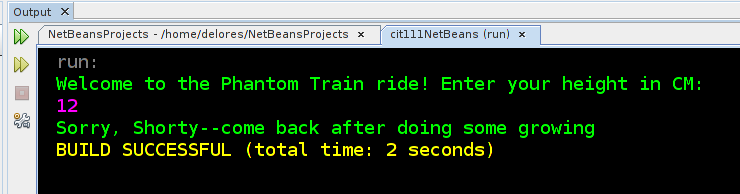
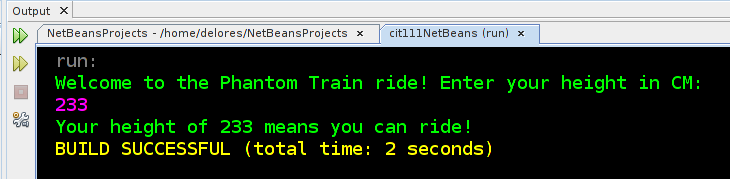
Your goal in this exercise is to create a program that reads in a height of a user in cm and compares it against the ride height minimum which is hard-coded into the program. Your output should work like this:
Sample output of a rider whose too short
Sample output of a rider who is tall enough to ride
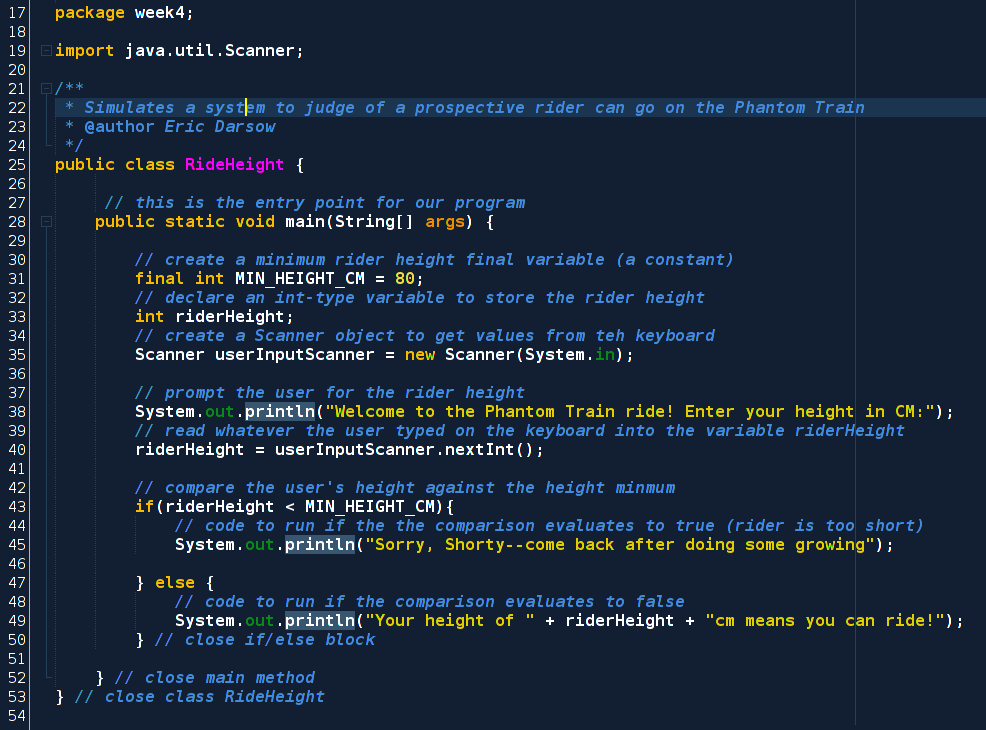
Note that we are working with integer values, not double values as we did in the core concepts section. To read an integer from the user, you'll still create a Scanner object with new Scanner(System.in) and store a reference to this object in userInputScanner. But, when you go to get data from the user, you'll use a line that calls the nextInt() method instead of nextDouble() as we did in the earlier program about tax values. This line assumes your variable name for storing the rider's height is riderHeight (but the variable name is entirely up to you:
riderHeight = userInputScanner.nextInt();
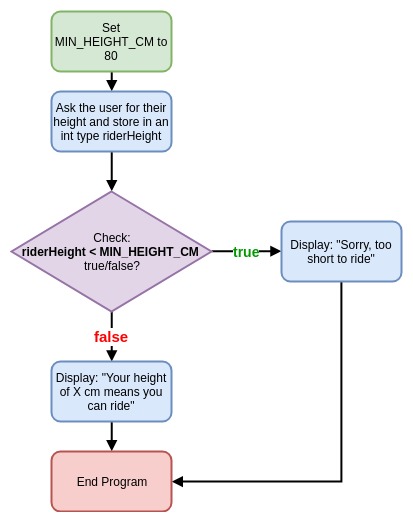
Before you start coding, review this flow chart and use it as a programming guide. Remember, take one box at a time, use your previous code to develop the Java syntax to make it happen, and then code it in NetBeans:
Give coding this program up from scratch your best shot. Be sure to reference the above sections because much of the code's structure for this program mimics our examples above.
As you review the key, don't be afraid to approach the same program with different strategies. The above source code is only one of several legitimate ways to meet the program specification.
Tinkering ideas:
If you found this program to be interesting, try these ideas for tinkering and changing the program:
- Print out the minimum height required to the user before prompting them for their height
- Adjust the comparison operator so riders who are exactly the minimum height CANNOT ride the Phantom Train
- Assume riders approach in pairs: ask for the first person's height and the second person's height. If either person does not meet the minimum height requirement, print that they cannot ride. NOTE: You'll need to use the && operator inside the () of the if statement meaning both comparison statements on either side of the && must be true for the whole statement to evaluate to true.
motorcycle
Exercise 2: Nested If() statements
Highway speeding fine calculator
In honor of Pittsburgh drivers who drive as if they've never seen a speed limit in their lives, work through this exercise to explore how to write an if() statement inside another if() statement. Refer to the section of our book on nested ifs referenced in the teal box at the end of the core concepts section.
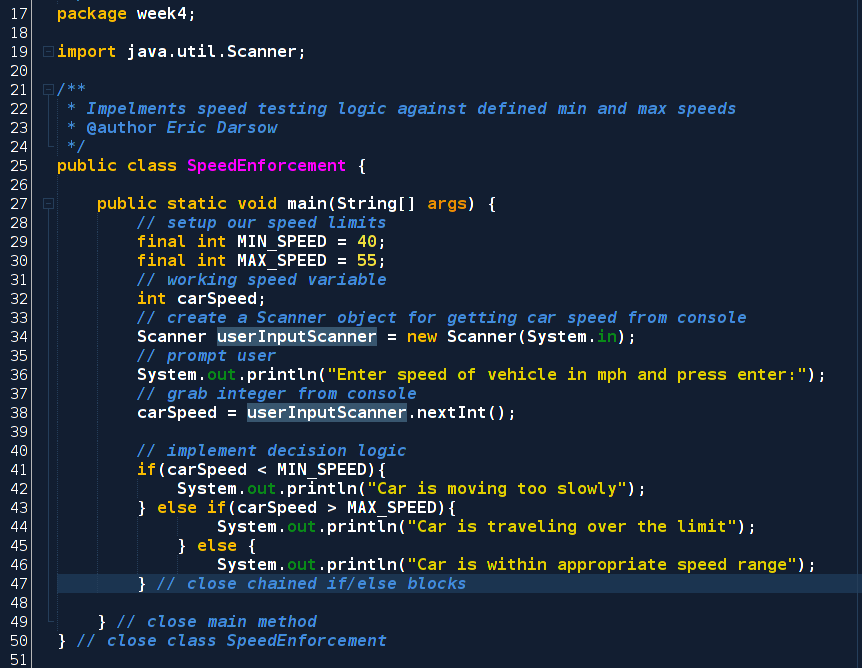
We are coding this in a class inside package week4 called SpeedEnforcement.
The following core idea box contains the program specification that we'll write in this activity. Read it carefully: your goal is to create a program that aligns to this specification.
highlightProgram specification: Imagine this program runs on the actual speed tracking device speed enforcement personnel might use to monitor the speed of drivers. The device has a minimum (40 mph) and maximum (55 mph) speed for the road entered in its memory by the programmer.
The user should enter speed of the tracked car into the console and the appropriate verdict should be outputted by the program. The program does not need to account for users entering invalid speed values--you can let them tank the program and get a compiler error (if they enter text instead of an integer, for example).
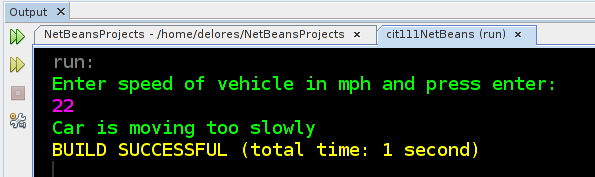
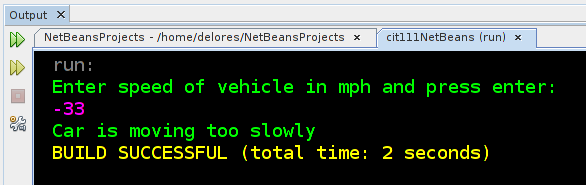
Sample program output of a driver going too slowly
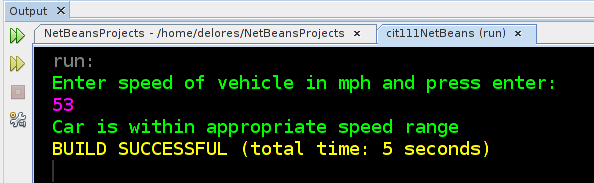
Sample program output of a driver going the appropriate speed
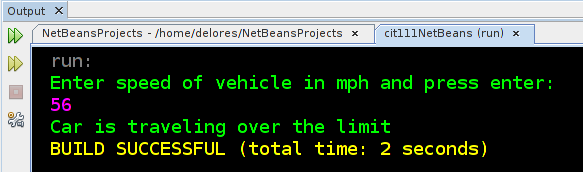
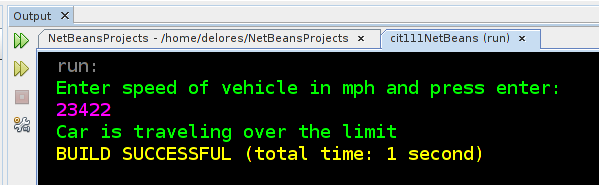
Sample program output of a driver going too fast
Exercise steps:
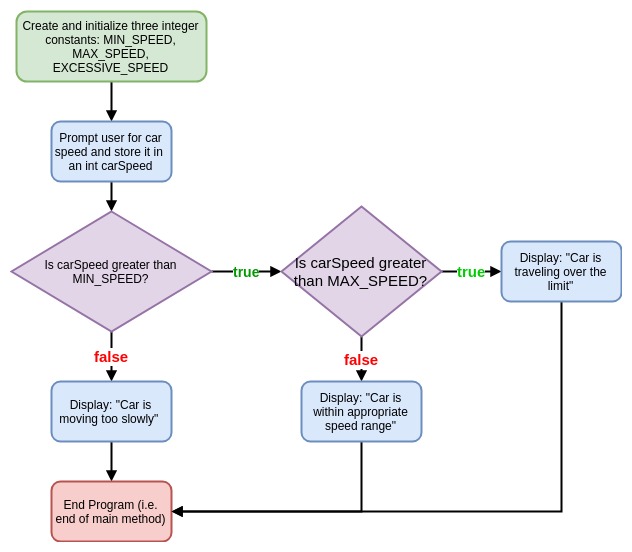
- Study the program specification above. Use the example flow chart from the core concepts section to draw (on paper) your own program flow chart. Remember, we have two logic blocks to create: one that checks if the speed is under the limit and one to check any speeds over that limit. In other words, you'll have the output of one decision diamond flowing into a second decision diamond. If you peek at my key diagram BEFORE you've tried your own, your brain will turn to mush!
- With working program logic represented in a flow diagram, you're ready to write code in our SpeedEnforcement class file. Keep the diagram in your view as you code: if you catch errors in your diagram as you code, change it to be accurate.
- With working code, test each of the three speed range values like the sample output shown above. Make sure you can check each part of your logic against the specification. Even experienced coders make if() logic block errors.
- Check "edge cases" such as a negative speed or a really high speed to ensure your logic works across the possible range of values a user could enter. here are two examples:
- Check your source code against the key if you'd like, by clicking the button below:
motorcycle
Exercise 3: Using String comparison methods in if() blocks
Exercise type: Writing a program
This exercise builds four new skills on top of this module's core concepts:
New Concept 1: Using a Scanner to gather String input
So far we have used our input Scanner to gather integer and double values from the keyboard and the console. To gather String (text) from the user, instead of calling .nextInt() or .nextDouble(), just call .next() like this:
String sampleString = userInputScanner.next();
New Concept 2: Comparing String (i.e. text) values to yield true/false which can control an if(){...} block using .equals()
We've compared numeric values using standard mathematical comparison operators like < and >. Text values are stored in Java using a String object--not a primitive type. We'll explore this concept in great depth soon enough. In the meantime, know that we cannot compare Strings for equality with the equality comparison operator: ==. Instead, we have to call a method on a String called equals() and give the equals() method a String value to compare. Study this code sample:
String textA = "toast";
String textB = "burnt";
boolean areStringsEqual = textA.equals(textB); //false
What value is areStringsEqual storing after these lines are executed? False! As expected. We can use this structure inside an if()'s parentheses to test for equality.
New Concept 3: Gathering user input twice using the same Scanner object
So far we have only used a Scanner object once during our programs. If we want to gather user input more than once, we only have to create one Scanner object with the new keyword. We can call any method we want as many times as we want after that one line. Study this code:
Scanner userInputScanner = new Scanner(System.in);
carSpeed = userInputScanner.nextInt();
riderHeight = userInputScanner.nextInt();
purcahseAmount = userInputScanner.nextDouble();
// we can call methods on our userInputScanner forever!
New Concept 4: Using conditional logic operators h4ke && to control if() blocks
Remember from module 3 we studied the various operators in Java. One set of operators we haven't used in any exercise thus far are the conditional operators of || and && that allow us to combine other boolean operators (< or > or >=) that give us true/false values. For example, suppose we have four numeric values and our specification calls for: 1) the first must be greater than the second, and 2) the third and forth equal. We can test both conditions inside the same if() block's check expression like this:
int valueA = 23;
int valueB = 1000;
double doubC = 34.4;
double doubD = 34.4;
if(valueA > valueB && doubC == doubD){
System.out.println("Both Conditions are True!");
}
Write a program that conforms to the following specification:
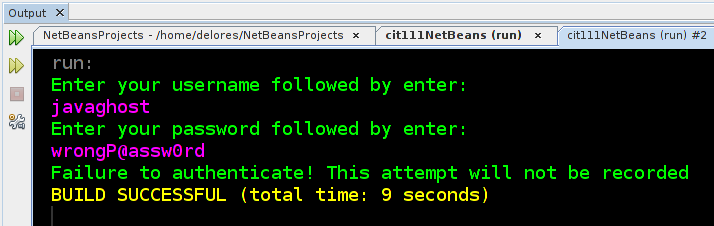
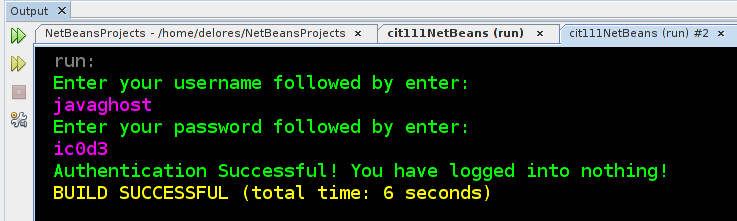
highlightProgram specification: Store a user's name of "javaghost" and their password of "ic0d3" in the program (i.e. hard code them). Prompt the user to enter their username. Then prompt the user to enter their password.
If the user enters both correctly, display a success message. If the user enters EITHER the username or password incorrectly, display an error message and then terminate execution. They are not given another try to enter their credentials. The user does not need to be told which of their values was incorrect--only that they were not authenticated.
Your program output should behave as these sample outputs show:
Failure to authenticate
Successful authentication
- Think and plan first! Generate a flow chart for this program's execution BEFORE you start writing a single line of code.
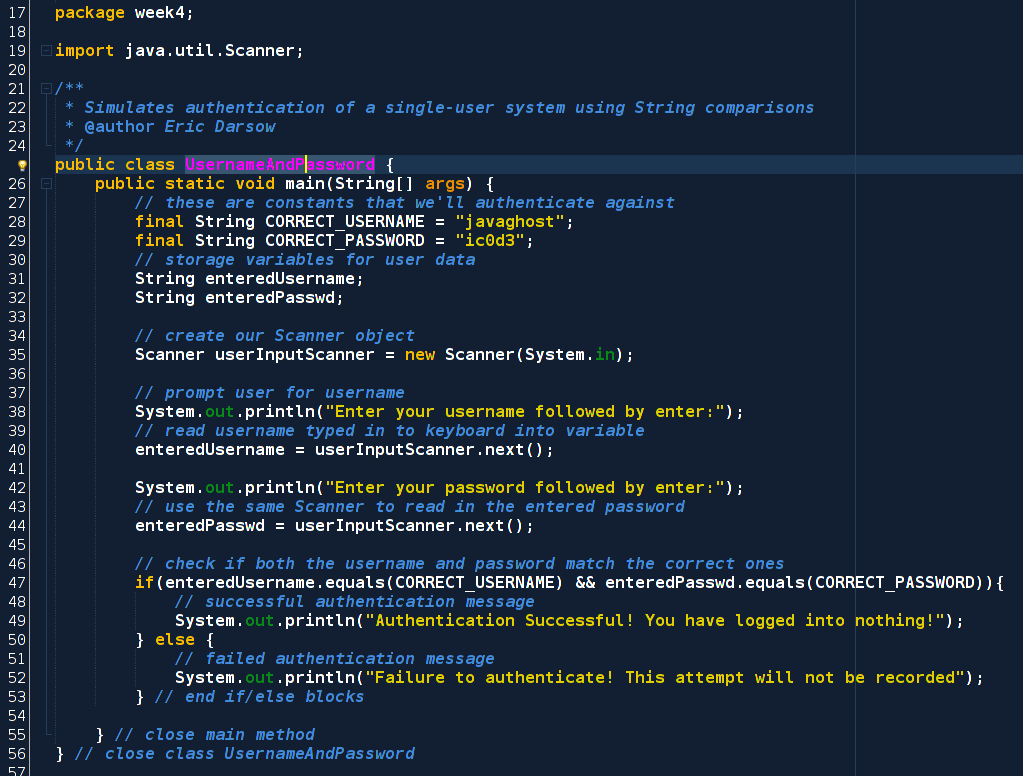
- Code up your program plan in the empty class we created called UsernameAndPasssword. Write the program's guts in the main() method.
- Test your program with several variations (correct username, incorrect password; incorrect username, correct password) to verify that the specification has been achieved.
- Check your code against the sample code. REMEMBER: several roads can lead to Rome in Java. The important outcome is that the specification is met, not that your code is written precisely like the sample.
build
Module mini-project: Do I have enough gas???
Exercise type: Module Mini-project for sharing
This is our first mini-project that involves writing a program with less support than is given in the exercises. Study the specification and sample output below, and then code your program.
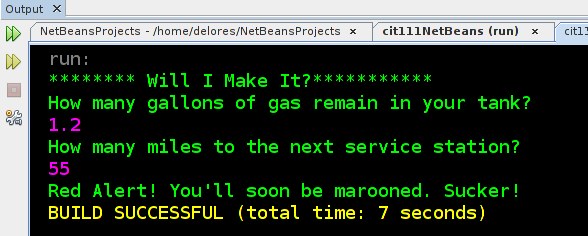
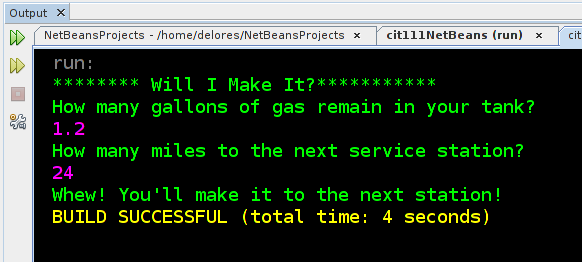
highlightProgram specification: The goal of the program is to determine if the driver of a vehicle has enough fuel to travel to the nearest gas station given the car's remaining gas amount in gallons and the distance to the nearest gas station. Hard-code a standard highway miles-per-gallon value of 28 mpg. Ask the user for the number of gallons of gas remaining in the tank. Then ask the user for the number of miles to the next gas station.
Based on the inputted vales display a message that tells the user if they are going to make it to the next station or if they should prepare to be marooned on the side of the interstate highway system.
Sample program output is as follows:
Output if user does not have enough gas
Output if user will make it to the next station
Calculation hint:
To calculate the number of miles a car can drive on a given volume of gas, simply multiply the number of gallons remaining by the miles-per-gallon rating of the car. So in the examples above, the miles that can be driven was calculated in Java by multiplying 1.2 by the hard-coded value of 28 MPG.
Remember our work flow involves more than just writing Java code!

- Make a plan/flow chart for your program
- Code your program WITH COMMENTS as necessary
- Upload your completed program to your GitHub account. And make an entry in the week 4 coding challenge tracking spreadsheet. (Directions and links coming on Monday evening!)
Eric will post a solution to this challenge at the start of next week and review it during the introductory video.
Extension ideas:
If you're finding this coding exercise straightforward, or you want a bigger challenge, adjust your program to meet the following specifications:
- Ask the user for the car's miles-per-gallon rating and factor this into your calculations.
- Ensure that gas remaining and miles per gallon are both positive values before testing to see if they'll make it to the next station. Tell the user to start the program over if either is negative.
- If the user will not make it to the next station, display the number of miles which will remain to the station once the car is marooned. Also display the amount of gas the driver will need to make it successfully. If the user will make it to the next station, display the number of "available" miles given the gas remaining.
- Get fancy with your math: code to the previous specification but add on the statistic: what miles per gallon ratio would the driver need in order to reach the destination IF there is insufficient fuel. (This would be helpful since cars get more miles per gallon as speed decreases to the optimal efficiency rate, which is usually somewhere in the 10-20 mph range.)
flight_takeoff
Extension activities
Exercise type:
Content
Page created on 18 Feb 2018 and last updated on 18 Feb 2018 and can be freely reproduced according to the site's content use agreement.