Module 3: Scope & Member Variables
Parent Content Chunk: 2 - Language Structures
A fully-baked Java class consists of class-wide data elements called member variables, and methods which operate on those member variables. We've been working with methods and variables since day one in this course. Unlike previous modules where we only declared variables inside methods, this module introduces the concept of variable scope which is a set of rules, enforced by the compiler, for controlling which blocks of code can access variables that are declared inside and outside of methods.
preparation |
This is the third module in Java Chunk 2: Language Structures. You should work through the following two modules which precede this one before commencing your study: |
||||||||
contents |
Core Concept: Exploring variable scope |
||||||||
lesson objectives |
|
||||||||
time considerations |
This is a hefty module and digesting its contents should probably be done over two sittings. Set aside 2-3 hours to work through the core concepts and exercises. Then dedicate 3-4 hours to programming your module project and preparing it for sharing. |
||||||||
resources |
Course Textbook - Java: Beginner's Guide. Chapter 4 starts with an introduction on Class structure and proceeds into methods, which we learned about prior to this lesson. Oracle Online tutorial on class structure. Note that this section is part of a larger section on object-oriented programming, which we haven't covered. Unless you want to study ahead, the sections before and after this one on classes would be extra reading. |
||||||||
setup your workspace |
Create a new package aclled weekB1_scope and create the following empty class files for use throughout this tutorial:
|
||||||||
"submitting" |
|
Module Core Concepts: Exploring variable scope
Scope Essentials
Let's jump right in and get our code dirty with scope! You should have already created a package called weekB1_scope and it contains a class called ScopeBasics. Transfer the following code into this class, reading as you go, line by line. TIP: Write the comments, too--for your brain!
Notice that the code included below contains two errors flagged by the pre-compiler: this is intentional. Make sure your code also has these errors as well and study the error messages carefully. We'll dissect them later in this section.
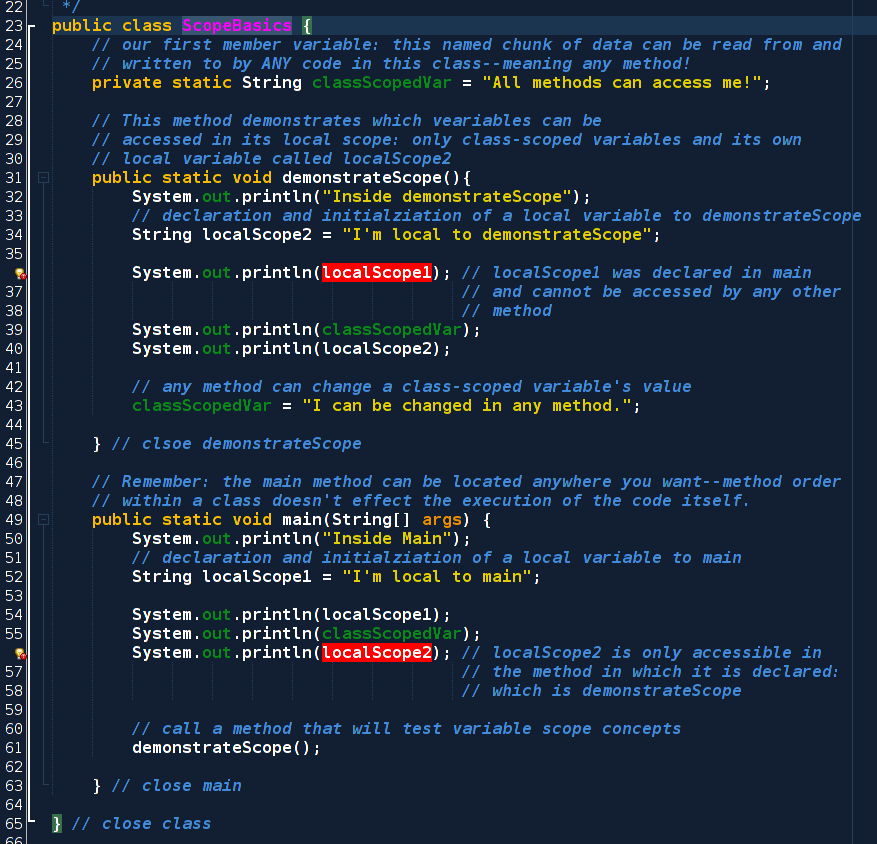
Green means class scope!
If you studied your test class carefully, you probably noticed that our member variable declared in class scope called classScopedVar is automatically colored green. Not surprisingly, this is the way the pre-compiler indicates the variable is in class scope. Variables in white text are local only to the method or block in which it was declared.
Why is out also green?
Now we can understand something about the somewhat mysterious code: System.out.println();. Since out is green, we know that it is actually a member variable located on the System object. The dot operator (what we call the access operator) allows us to access both member variables and methods on objects. In this case, we're accessing a member variable on the System object.
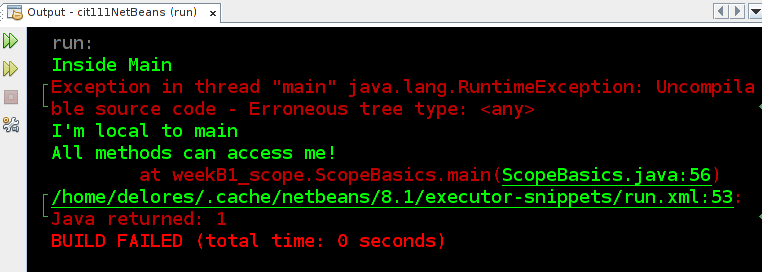
Try compiling this class
When you run this class (you may have to tell NetBeans to go ahead and try running a program with errors), you should see this output which demosntrates that as soon as the JVM reaches a call to access localScope2, an error is encountered. Handily, the error message provides us a line number containing the error: 56.
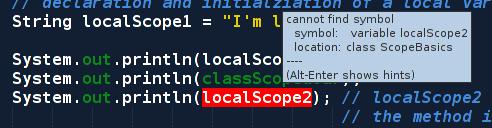
When we go back to line 56 and hover our mouse over the variable localScope2, we see the following message: cannot find symbol even though we have declared this variable on line 34! This makes sense because the variable localScope2 is only accessible inside the block in which it was declared (and any nested blocks, of which there are none in this case). To the pre-compiler, localScope2 only exists inside the demonstrateScope method. It is invisible to all other code in the class.
But I want working code!
Since the compiler throws an error with our calls to variables outside of scope, we can fix the errors simply by commenting out the two offending lines, like this:

A close look at the ScopeBasics class
Unlike our run-of-the-mill local variables that are declared inside a method, member variables such as classScopedVar in Listing 1 are declared outside any method and thus are located in "shared" class space. This is handy because any method can read or write this variable which allows us to easily create multiple methods that manipulate the same data.
Study the following diagram of the ScopeBasics class with annotations that discuss the concepts of scope we're exploring so far.
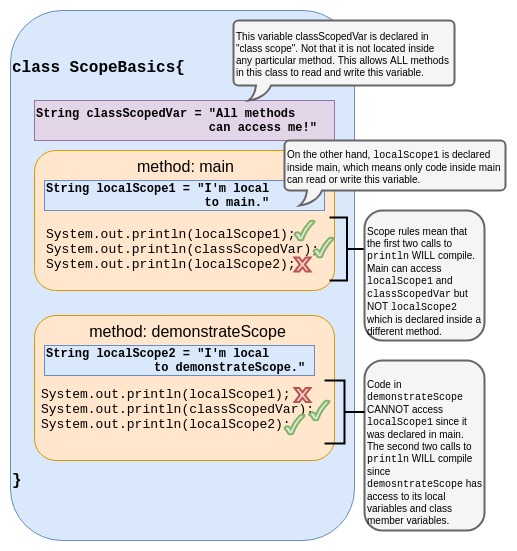
When we plan a class, we should declare member variables for values that relate to what the whole class does, such as convert various quantities. If a value is only needed to do a task that a single method carries out, palce the variable in that local method scope.
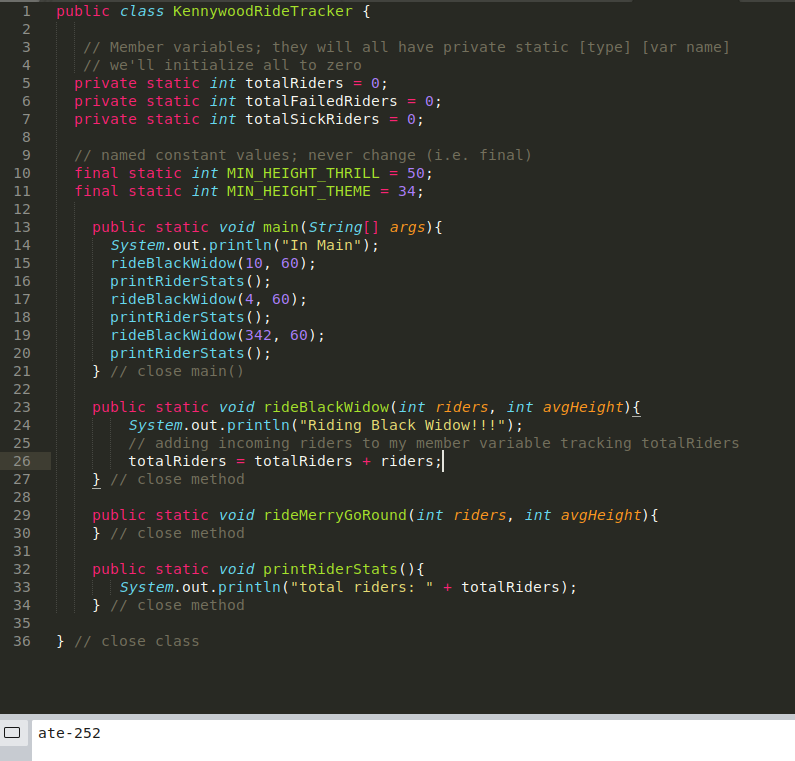
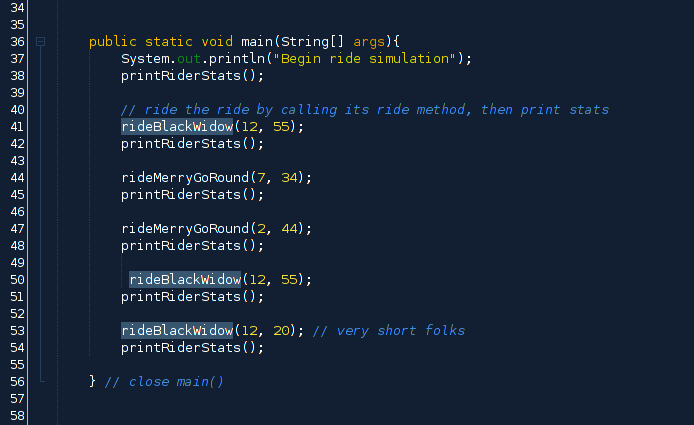
Exercise 1: Creating a well-formed Kennywood Ride Tracker Class
Exercise type: In-class code-a-long with Eric
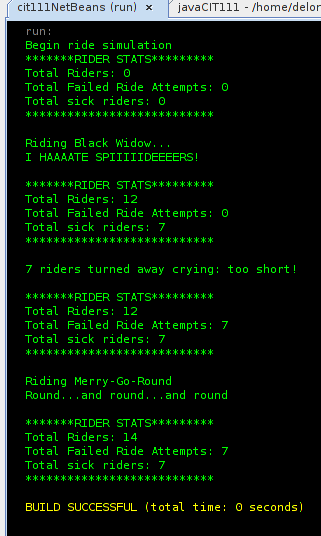
Our goal is to create a class that models folks riding thrill and theme rides at Kennywood. We want the class to contain member variables that track the total number of riders across all rides, so park planners can make staffing and resource decisions. The output can look like this: notice that the Rider Stats track three metrics, each one corresponding to a member variable.
- STUDY steps 2-5 with a partner and a single sheet of paper. NO CODE YET! Create a class diagram like the ones in the images above of the member variables, their names, and the methods, and their calls, in your diagram. We'll use this to code but we want to THINK and PLAN first.
- Create a new package called ls3_classStructure. Inside the package, create a class called KennywoodRideTracker. Create a main(String[] arts) method.
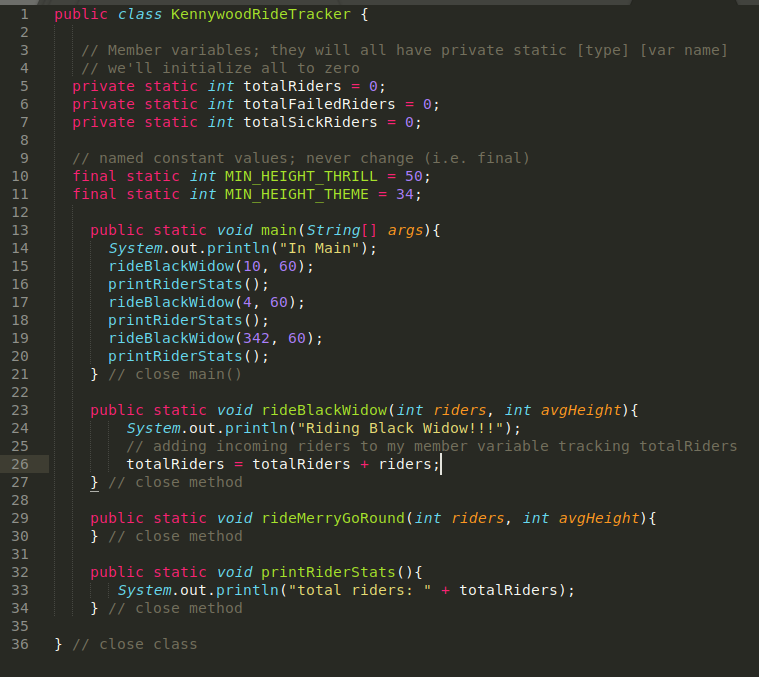
- Create our member variables that store information that all the methods in the class need to have access to:
- An integer called totalRiders that is private and static, initalized to zero. This member tracks the total riders that have ridden on any ride in the class.
- an integer called totalFailedRideAttempts which is private and static and initialized to zero. This will track the number of riders who tried to board a ride but were too short to pass.
- an integer called totalSickRiders which is private and static and initialized to zero. This will track the number of riders who get sick on the ride. We'll use a random number generator to pick riders to cast a sick spell on.
- Two final class members to store the minimum height for riders on the thrill rides and the theme rides. You can name these! These should be declared final static and int. Their names should be in all capitals to signal they are constants. Assign a value in inches to each constant; make the thrill ride minimum higher than the theme ride minimum.
- Create two ride simulation methods. The first should be named rideBlackWidow. The second method should be called rideMerryGoRound. Both should accept two parameters:
- An integer called riders
- An integer called avgHeight
- Create a fourth method (main() plus the two rides) called printRideStats() that accepts no parameters and doesn't reutrn any value. We'll use this method to keep our main() method clear for testing the individual methods. We want to be able to call printRideStats() and see all our member variables' values displayed! This is separation of concerns: this method prints stats. main() tests methods.
Note that this solution only contains the method signatures but NOT the five member variables. This is an error.
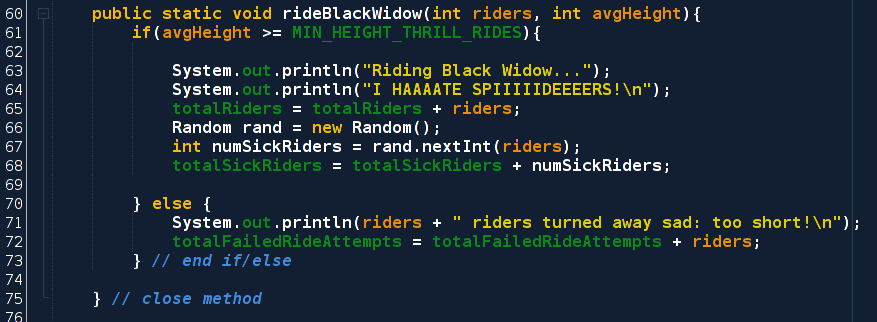
- Program the logic inside our ride-simulator methods. We want to pass into each ride a number of riders and their average height. (We'll imagine that all the riders get judged on their average height only.) That sounds like a condition for riding, that can become an if()-controlled block. We want to add our riders and turned away riders to their respective member variables. We also want to generate a random number of riders who get sick and add that to our third member variable.
Use this method flow diagram to try programming the guts of rideBlackWidow:
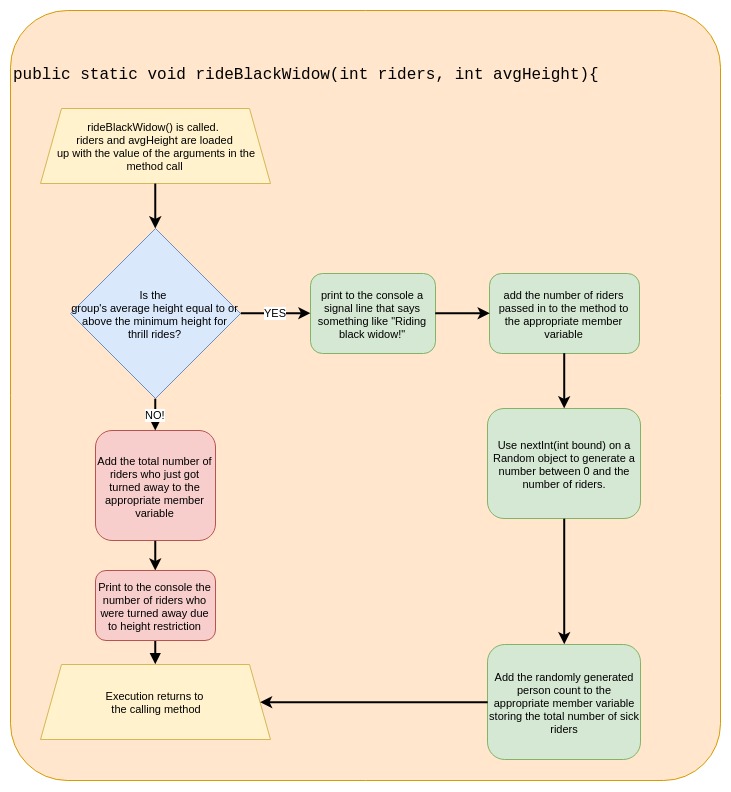 Your call to Random.nextInt(int bound) will involve three lines of code: the imprt statment for java.util.Random, a line that creates a Random object, and a line that calls a method on that Random object:
You can do the import statement-- add the line import java.util.Random right before you declare your class.
The Random object creation and call to its method are shown here:

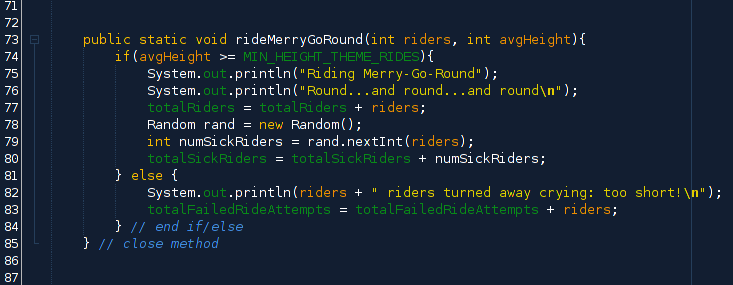
- Copy and adapt your rideBlackWidow() method's guts you just wrote into the abodmen of the rideMerryGoRound() method. You should now have two methods ready to accept riders!
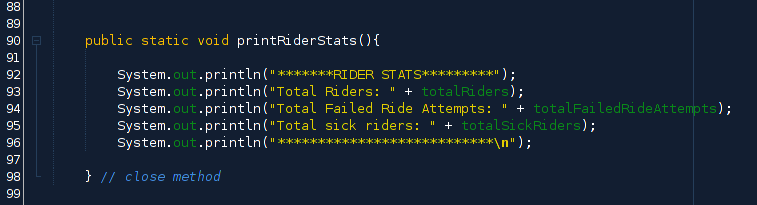
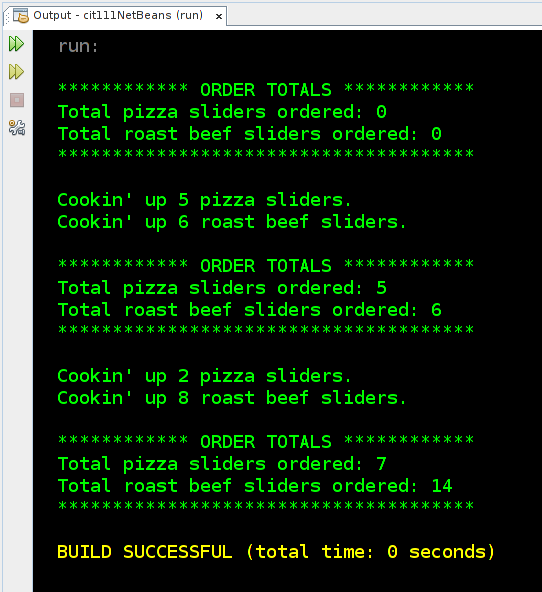
- Write the code for the printRiderStats(). This is a simple method with only System.out.println() calls which each display one of our three member variables. The output of this method should look something like this:
- We're ready to test our methods and member variables in main()! Our code in main() is very simple. We alternate calling printRiderStats() to show the status of our member variables and calling individual ride's methods, passing in a rider count and height of your choosing. Flesh out your main() method with at least 5 calls to rides with riders of various heights, some of which do not pass the minimum threshold. Test your code to make sure the member variables are correctly incremented.
- Grab your class diagram and check to see if the diagram and your new code are consistent. Discuss with your partner what the differences are between your plan and how we carried the plan out. Reflect on how you can create more accurate class digrams, please.
access the exercise source |
Extension Ideas
With your initial Kennywood Ride Tracker class up and going, consider the following embellishments to make your program more comprehensive.
You are not asked to upload and share this particular exercise with the course, but if you do some cool renovations to the code provided, by all means please upload your class file and log it in the index for other students to explore!
Idea 1: Percentage statistics
Add code to your class to provide percentage statistics along with the counts of the three tracked rider categories: total rides, failed rides, and sick riders. Compute the percentage of park guests who tried to ride either ride but were turned away due to height restrictions. Also compute the percentage of riders who got sick on each ride. You can display these stats along with the counts in the printRiderStats method.
Idea 2: Randomly generating rider counts
We used a random number generator to simulate some of the riders on each ride getting sick. Expand the use of random number generators to create the initial rider counts and the rider heights. These are currently hard coded in your method calls inside main. You'll want to be thoughtful about how you generate your height values. You can start by just randomly generating a number between some minimum number of inches and a max, but remember heights are not evenly spaced out from 0 inches to X inches. Do some research to see how you can generate a random number between, say 30 inches and 80 inches.
Idea 3: Use looping to simulate many rides
Once you have a random number generating rider counts and heights, create a while() or for() loop system to simulate a specified number of rides. This is the foundations for creating what could become a very advanced park ride simulation tool! Say, for example, we wanted to predict ride usage and optimal park hours. We could integrate such parameters into the program and create special methods that could generate estimated ride counts based on the time of year, the day of the week, the average temperature, etc.! Very cool.
Idea 4: Track sick counts by ride
Split the totalSickRiders member variable into a sick rider count for each of your rides. If you tackled the first extension idea, you can now add a percentage of sick riders by each ride in the park when you display total rider stats. In theory, then, we could track which ride makes folks sicker: the spinning one or the big, scary swinging Black Widow ride. To make this more interesting.
Idea 5: Integrate revenue and profit metrics
Add a ticket price for youth and adults in our KennywoodRideTRacker class. This means two more member variables. Add a third new member variable called totalRevenue that tracks ticket sales overall. Now, if somebody rides a theme ride, like the Merry-go-round, we want to increment the number of "youth" and calculate a total ticket revenue. If a rider rides the thrill ride, consider those riders adults, a multiply the number of riders times the ticket price for adults, and add that value to your totalRevenue member variable. Do the same for youth. Print out the revenue in printRiderStats() method. If you are the finance type, you could also generate a profit metric by creating a hard-coded "cost per rider" amount that attempts to factor in the various costs associated with running an amusement park.
Module Mini-project: Creating an order tabulator
This project involves creating a system much like the KennywoodRideTracker class which uses member variables to track several quantities which are adjusted by calls to a set of methods which act on that data. Review the project specification carefully and design your class carefully.
program objective |
Create a program that could become the basis for a Point-of-sale (POS) system used by staff at a restaurant. The application should manage the ordering of two different food items by tallying the total number of each item which is ordered. |
program requirement 1 |
Create a member variable for each of the two items that the system manages orders for. For example: if the system tracks the number of pizza sliders ordered by all customers, the member variable could be called numPizzaSlidersOrdered. This variable needs to be accessible to all methods. |
program requirement 2 |
Placing an order is simulated by a call to a method dedicated to ordering that particular item. For example: if the user orders three pizza sliders, a method called something like orderPizzaSliders should be called from main and the number of sliders ordered should be passed as an argument to this method. |
program requirement 3 |
Just like the KennywoodRideTracker, create a method called something like displayOrderTotals which can be called by main and lists to the console the running totoal of how many of each item has been ordered so far in the program's execution |
program requirement 4 |
After your core methods are written, flesh out your main method's guts by making a few calls to each of your order methods. You may hard-code the order quantities into the calls to these methods for the purposes of testing in this exercise. If you are feeling confident, build in a user interface such that the user is prompted for the number of each item to purchase and the appropriate methods are called based on that user input. |
Sample program output
Output of a program that meets the above specification is included below for your reference. Remember, your program does NOT need to produce output that is EXACTLY like this sample: you are invited to be creative and customize your program.
Submission
As usual, prepare your class for sharing by commenting all your code, noting any outside resources used in your comments, and checking that the output is clear and neat.
When you are ready, upload the file to your GitHub account and make a corresponding entry in our submission index.
Mini-project extension activities
Try these adjustments and/or embellishments of your module mini-project.
Extension Idea 1: Add a user interface
Build out your main class by adding user input into the system, as would be the case for any actual point-of-sale system. Allow the user to select which menu items have been ordered and the quantity of each order. You could assume the user is a staff at the restaurant or the end customer. Depending on who your user is will dictate what options the program provides.
Extension Idea 2: Inventory tracking
A common tool that is useful for restaurant owners is a raw material inventory tracker. Design a system for your program to track the amount of raw food goods that are available and provides a running view of how that food stock is depleted as ordered are made. For example, both of the example food items in the output are sliders, which are mini-sandwiches. If your restaurant also served sandwiches, you could create a member variable that represents the total buns in inventory. Each time either slider is ordered, the bun count is depleted by one, etc. You could track meat by ounce and associate each item with a fixed amount of meat per sandwich.
Extension Idea 3: Inventory tracking with outage warnings
Building on extension idea 2, create code that will tell the user if there is not enough raw material in inventory to complete an order. You can make your program useful by telling the user how many items could be ordered if he/she/they request an order that is too large to be filled given current inventory levels. This could potentially get tricky if you are tracking some inventory items that are common among several orderable items: you'll need to decide how to report available orders that can be filled by item.
Extension Idea 4: Order price facilities
Associate each item with an item price and compute an order subtotal, and a final total with tax, for each order submitted. Tally the total order revenue generated during a single program run and display that at the conclusion of the program.