This is a companion document to our course module menu which presents the content projects for this course. Use the links in this toolbox as referenced in the module guides.
Find a tool for your every course need in the list below. Questions? Please call the CIT-100 help line at 412.894.3020 or email your instructor: ericdarsow@ccac.edu.
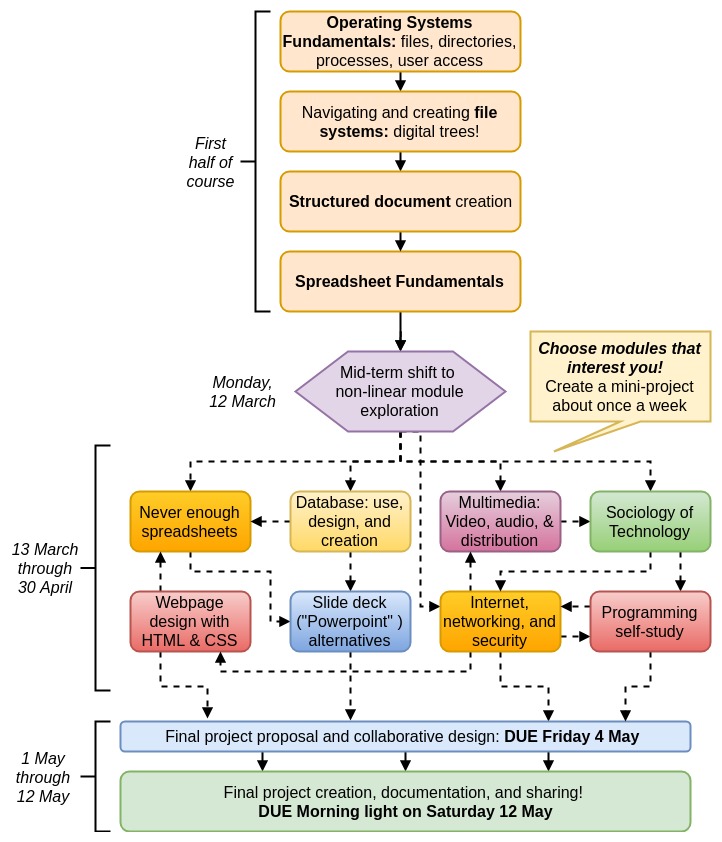
Course sequence flow chart
This online course has been a work in progress throughout the term. The following image conveys the phases of the course and highlights the key due dates for the remainder of the term within the figure.
Universal work submission guide
For all module mini-projects, final project proposals, and final projects
Preparing your work for sharing involves a few steps that should be followed closely. Not only does the process offer you good practice in file manipulation, correctly uploading and logging your files allows other CCAC students now and in the future to benefit from your work.
This process is exactly the same for all module mini projects and final project related files. One you get the swing, you can use the quick links directly and don't need to work through the steps.
Guide Video
This short tutorial video reviews submission steps
Remove any personally identifying info you don't want plastered on the WWW
Step 2: Assemble files
NOTE: If your entire mini-project exists in a single file (like a spreadsheet or word processing document), you can SKIP this step and jump to step 3: naming.
Many projects involve a few files, such as a word processing document, an image, or a spreadsheet, etc. We need to keep these all together and submit them as a correctly named directory
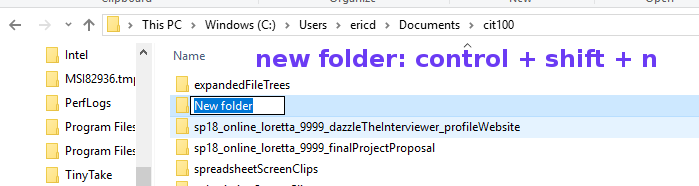
If you did not do so when you were working on the module, navigate to your cit100 directory in file explorer. Create a new directory by holding down the control key, the shift key, and then tap the 'n' key.
Name this directory using the name structure in step 3.
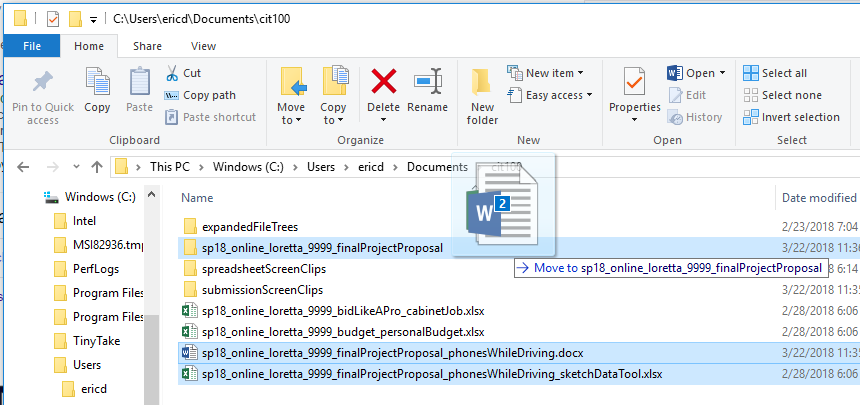
You can then click-and-drag in the files that belong in the newly created directory. The screen shot you can see by clicking the button shows moving two files into their correct directory. You can select multiple files at once by holding down the control key and clicking on individual files.
Once your files are grouped into a single directory, navigate up to the "parent" directory of your work, so you can see the directory itself, not the contents.
Step 3: Correctly name your files
Step 3A: Turn on file extensions
You should be viewing your files in a file explorer program. If you are using the Microsoft Corporation's Windows 10, we need to turn on the view setting for showing file extensions by clicking the View ribbon tab at the top of file explorer >> check the box next to "File name extensions'
Step 3B: Standardized file naming format
Filenames are like mailing addresses: each letter counts. All files and directories you share in this course should follow the same universal format. Stated generally:
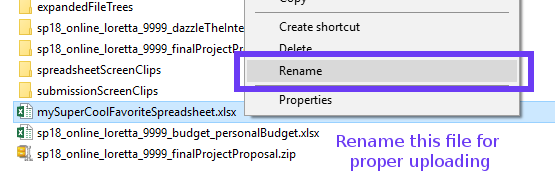
Loretta just finished her Bid Like A Pro module mini-project and her spreadsheet is ready to share. She has renamed her file to follow the above format:
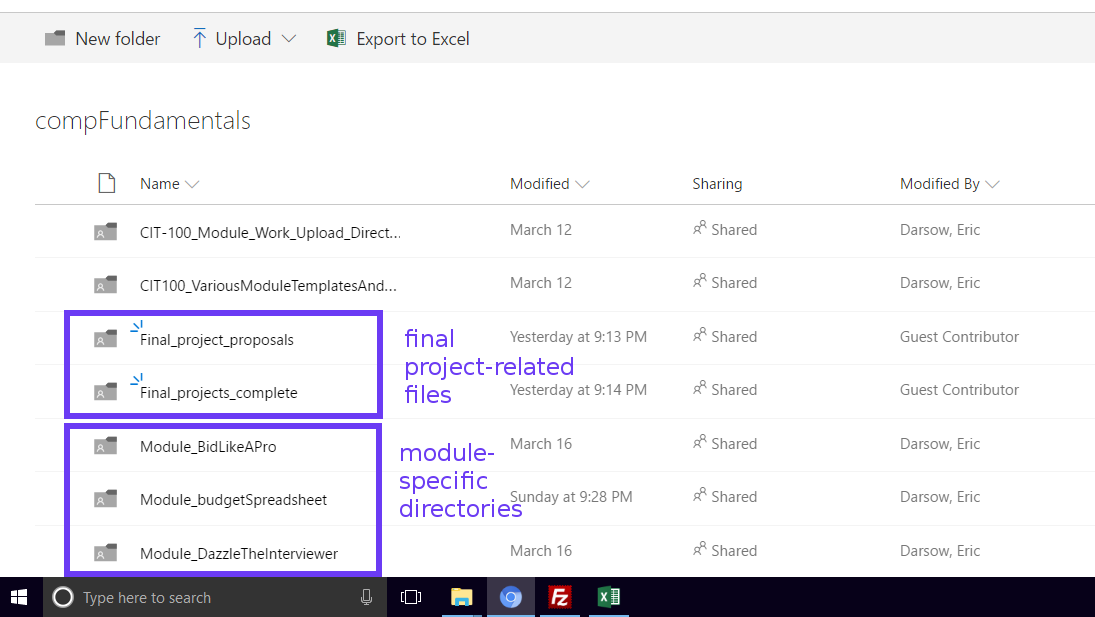
Each module has its own directory whose name starts with "module" followed by the exact title of the module in our menu.
Final project proposals live in the directory called 'Final_project_proposals'.
Completed, fully-baked final projects live in the directory called 'Final_projects_complete'.
Step 5: Upload files or folders to Microsoft's OneDrive
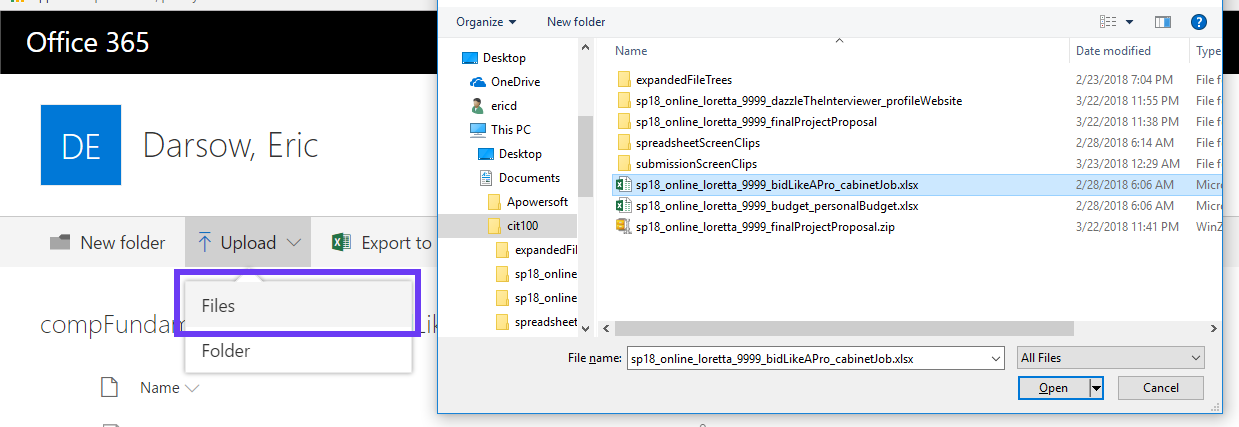
Single file uploads
If you have only one file to upload, make sure you are in the proper directory from the previous step. Then navigate to Upload >> Files in the tool bar inside the shared directory. Find the correct file in the file browser that pops up.
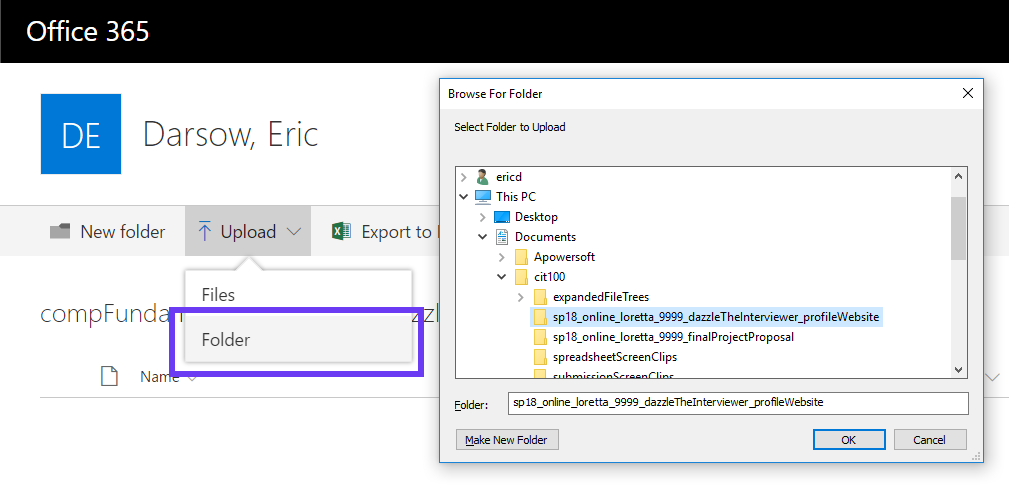
Folder (i.e. Directory) uploads
If you are uploading a directory of multiple files, make sure you are in the proper directory from the previous step. Then navigate to Upload >> Folders in the tool bar. Select the correct folder in the folder browser that pops up.
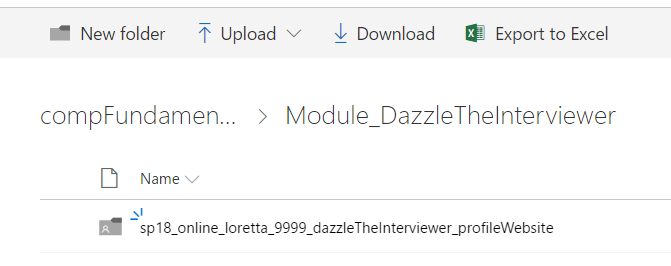
With either your files or folders uploaded, tap the 'F5' key to reload the page. Check to make sure your file or folder made it 'up to the cloud'. If you uploaded a directory, navigate into the directory and make sure all the files made it in.
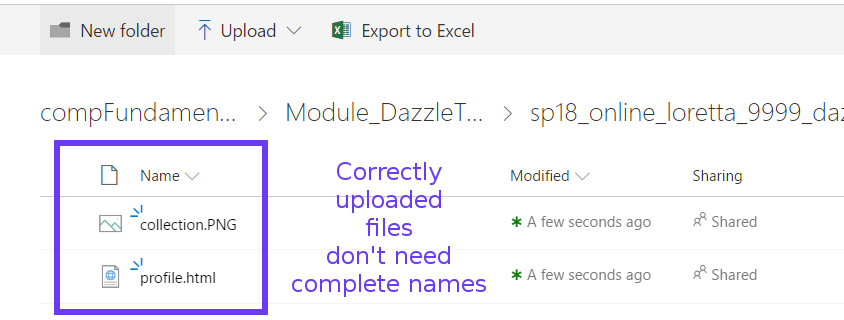
Correctly uploaded folder
Click into folder and check the file contents
Oops! I made a mistake!
It's okay! The public doesn't have 'delete' permissions in the shared directory (for good reason), so just go ahead and make any changes you need, re-upload your work, then email your instructor at edarsow@ccac.edu and note the files that should be deleted. He may take a little while to correct this, but that's okay--it's not urgent.
Step 6: Complete your submission quiz in Blackboard
The final stop on this marathon is to complete the submission quiz on Blackboard for this course so your teacher can keep track of the work you do.
Note that in this quiz, you're asked to list the exact name of the file you uploaded. A handy way to avoid retyping this completely is to find the file you just uploaded in windows explorer and copy the exact name using these steps:
Click once on the file to select it
Hit the F2 key for rename. This enters 'edit' mode
Select all the file name text with control + a (for select all)
Copy the entire file name with control + c
Hit escape to exit edit mode without saving changes
Now navigate to the spreadsheet cell under the "exact name..." column of the index. Press control + v (for paste) to paste in the file name you just copied.
Step 7: Whew! You're done!
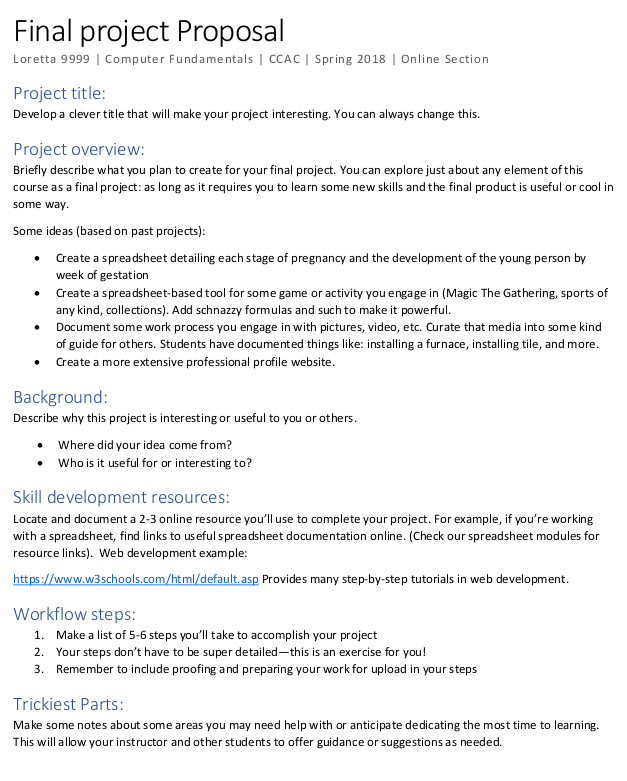
Final project proposal guide
Due Date: Tuesday, 4 December @ morning light
Bring together your learning from the entire course in the design of a final project that focuses on a set of skills or tools you have found most interesting. Remember: you can submit your proposal anytime you want! If you submit before May, please email your instructor for advanced review.
Final projects explained
Check out this in-class recording of Eric explaining the final project to his evening section of CIT-100 at the West Hills Center. There is no information in this video that is not also documented in text throughout this page.
Proposal Guide
Expand this section to read all about designing your final projects.
proposal process overview
Your final project is a culminating activity that asks you to create a fully-baked, sharable, informative project that requires you to learn new things, produce something useful, and document your work.
project requirements
Based on a compute technology we work on in this course (spreadsheets, databases, networking, web development, file management, etc.)
Requires original creation -- not copying what another student has done. It can certainly build on previous work: that's a fantastic idea!
Requires between 15 and 20 hours of work and learning, including creating the proposal, doing the project itself, and documenting the work.
Fully documented for future students
project steps
Read through this proposal guide & the final project documentation section below
You need a directory to store various project-related files. Navigate to your cit100 directory in windows explorer. Create a new directory by holding down control + shift and tap the 'n' key. Name this directory using our naming guide above.
As you complete this proposal and the project itself, store all your files in this directory for organization and submission.
Design your final project. Contact your instructor as needed during this process. Best not to wait 'til the last minute. (But hell, it happens. We do our best.)
Create your proposal and upload and log it by the due date. (That takes you to the end of this guide.)
Study the following template as you prepare your project proposal document. This exercise is about both planning your project and creating nicely formatted structured documents in a word processor (i.e. using title formatting and header styles).
Due Date (Fall 2018 online): Tuesday, 18 December @ morning light
Once your final project has been designed, implement the steps you laid out in your proposal. Compile all the relevant documents and share them using our universal sharing guide.
before you start
You should have created and submitted your final project proposal using the guide above.
You should also have a final project working directory that you created in the proposal guide above.
carry out your project!
Implement your project proposal. Have fun! Tinker. Learn. Read. Share. Ask friends for help. Call your instructor! Try stuff out. Screw up. Read some more. Have some more fun. Make mistakes. Get dirty. Blow up your computer.
take screen shots
We want to be able to share and explore your project, so use the "Snipping tool" in Microsoft Corporation's Windows 10 operating system to capture some screen shots of your project's key products. Name the files appropriately.
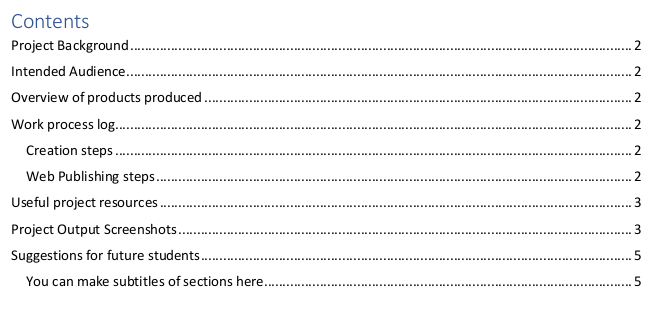
Put your structured document skills to work and create a project report with at least the sections shown in the screen shot of the sample project report.
Creating the final report is about both sharing your project and learning to create nice, structure documents with tables of contents, etc. These resources will come in handy for learning to do these skills. If you don't like these tools, feel free to use your favorite search engine to find others--and include them in your resource list for others!
Ensure that all of your final project related files (including your proposal and final report) are in the same directory that you can upload to our final projects directory in the cloud.